The Clay Sampler Course was fun, we had 4 different instructors, with 2 classes each. So we were exposed to lots of different techniques, and expertise. I was happy to pick up some of my finished pieces this week. There are still more in the kiln, and some more pieces I have yet to glaze. But here is the first set...
The first 6 items are a set of shallow bowls which Jay showed us how to create, using a "cow's tongue" to flatten the bowls without slumping, and using a soft template and cutting the clay while still fresh. It was a pretty neat technique, and created some funky shapes fairly quickly and easily. Although we did trim the bottoms once leather hard, so that took a bit more time.
I decided I would experiment with some more slip trailing, but the results were not always what I hoped. Many times when I tried to draw out a line, the slip didn't come out as a stream, but rather as dots. Other times, I had a bubble of air, or for whatever reason, the slip sputtered out all over my pattern. In some cases, I wanted the slip to be fluid, but the clay absorbed the liquid too fast, so I didn't get the effect I had hoped. Many of my designs were the "plan B" to what I had originally intended, but I like to just "go with it", and see where the materials take me. For the most part, I'm pretty pleased with the result.

#1 - For this bowl, I started with about 900g of B-Mix, which is a rather firm white clay. I added a background of White slip with my finger, and a design in Black and Turquoise slip. Once it was bisqued, I sprayed the top with Clear glaze, then waxed it, and dipped the whole thing in Matt Green. That didn't work too well, with a lot of Matt Green clinging to the waxed top. So I ended up wiping it off. Where I hadn't wiped it completely clean, I can barely detect Matt Green smudges, but they don't seem to detract at all from the design. I like the Matt Green bottom. It is a nice contrast to the top, and I like the matt feel of it. As you see, I stamped it on the bottom side, but Matt Green seems to be a glaze which doesn't let the pattern show through well.

#2 - This bowl started as 800g of recycled clay. I had switched over to recycled (a mix of mostly white and grey clay) since after centering and throwing a few bowls with the B-Mix, I was getting too tired fighting with it. In the center, I had laid down rings of Blue and Black slip, and had tried feathering it, but it was a bit dry and didn't feather much. I can't remember what I was trying to do with the White slip originally, but it splattered on me, so I added a splatter pattern all over the bowl to make it look intentional. On the back, I poured Deep Blue then Matt Green glazes. Then I sprayed top and bottom with a light coat of Clear glaze. This is one of my least favourite, but all of the bowls were a good learning experience, allowing me to experiment with different techniques.

#3 - I like this bowl, which started as 900g of B-Mix. I added a background of White slip, then started adding rings of Black and Turquoise. At some point, the Turquoise splattered, and that inspired the splattery pattern around the outside, with Black dots for character. The back is glazed in Deep Blue and Matt Green, and then I sprayed both top and bottom in Clear, for a shiny effect.
#4 - This is a fun bowl. It started as 900g of B-Mix, with a slip pattern in Blue, Black and Green. It was sprayed top and bottom in Clear, and then I waxed the inside of the bowl, leaving a border along the rim, and then dipped the whole piece in Matt Green. I like how the glaze added a strong green border to the design. My stamp on the outside is barely visible, under the Matt Green.
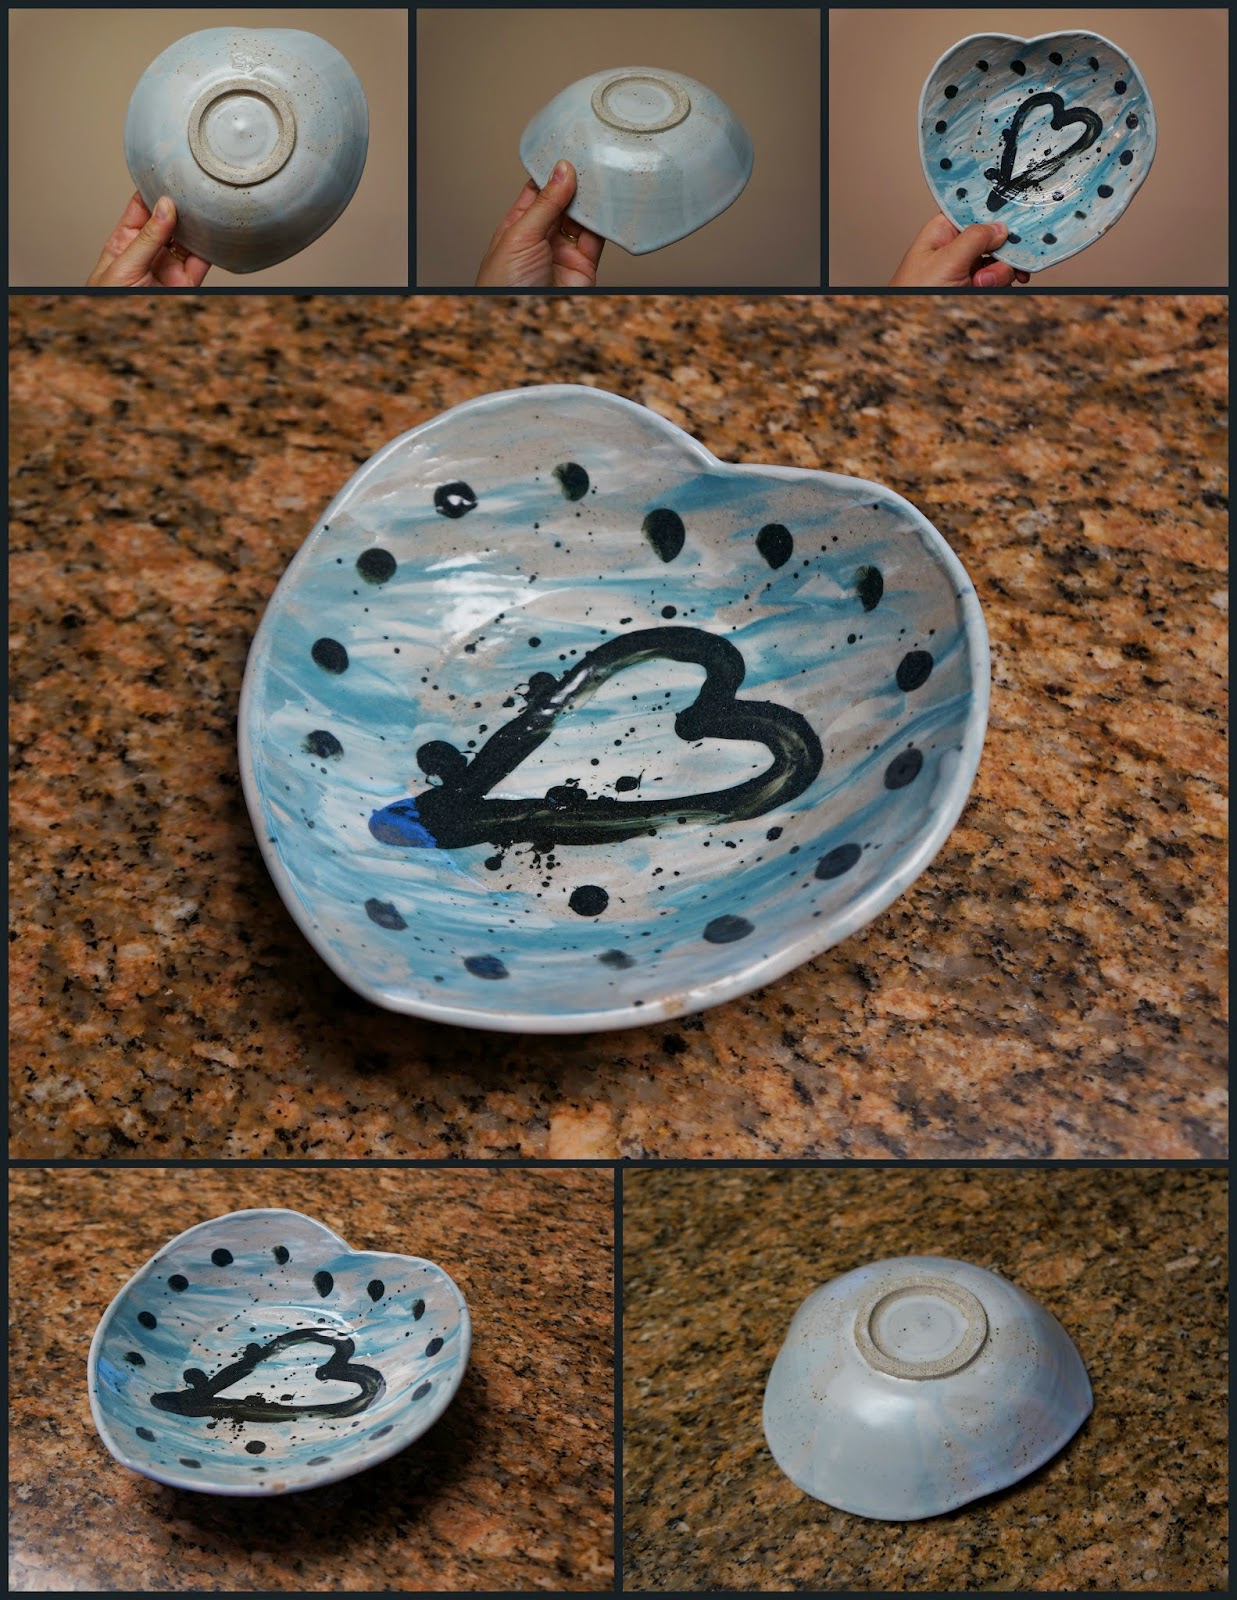
#5 - This bowl started as 850g of recycled clay. I can't remember if there was a reason why I chose a heart shape, but this one I cut freehand, no pattern. The slip pattern is Turquoise, White and Black. The inside of the bowl was sprayed in Clear glaze, and for the outside/back, I poured Oatmeal then Celadon. The Celadon gives the outside hints of turquoise, which match nicely with the turquoise inside.
#6 - This bowl made the 2 days of effort worthwhile. I love the effect. It started as 1000g of recycled clay. I had added Turquoise slip, and was planning to recreate something like the sunflower bowl I created in the last course (
#22 in this set). But when I started adding White and Black slip along the rim, it dried too quickly and refused to run down to the center, so I decided to "help it along" and created this mottled texture with my fingers. The inside of the bowl is sprayed with Clear glaze, for a nice shine, and the back is finished in the rich chocolate colour of the Amber Celadon glaze. My stamp shows through nicely at the back.
I really love the unique handmade look and feel of this bowl, and when you turn it over, the chocolate colour is a pleasant surprise, you would otherwise expect turquoise.
Looking at my log book (which is a GREAT help to me, to keeping track of my pieces, and remembering what glazes and slips I used), I still have 2 more bowls which I didn't find this time, so will need to pick them up at next opportunity.


No comments:
Post a Comment