Sunday, April 10, 2016

More Finished Ceramics from my Pottery Tools Course

Continuing on from the previous post, this is more of the recent finished items I hauled home.  All items made from P570 white clay, unless otherwise noted.  All bear my signature stamp somewhere on the piece, usually near the bottom :

Textured stoneware pot, by Lily L.
6) I'm not sure what to think of this one, but it is starting to grow on me.  It started as a pot which was too ordinary, so I applied dots of white slip to it.  If I remember correctly, I dipped the entire pot in Ash Yellow Glaze, then just the top half and rim in Deep Blue.  Then for interest, I dribbled some Khaki glaze inside.  I like that effect, of the Khaki running to the bottom of the pot.

The following are 3 tea bowls I made, so I could try out my rope textured paddle.  All were glazed with Carbon Trap Shino.


Tea bowl in Carbon Trap Shino, by Lily L.
7) This first one is my favourite.  I like the shape with the distinct high foot, so you can easily slip your hands around and under it.  I really like the shino magic : varying colours, from beige to gold to reddish-brown, to dark grey/brown.  The rim is especially nice, with a gold metallic sheen.  I like the little swirl inside at the bottom, as well as on the trimmed foot.  Unfortunately, this one has a small crack, so while it's still functional, I think I will be keeping it just for display.

Tea bowl in Carbon Trap Shino, by Lily L.
8) This one also has lots of shino colour magic, a nice clean foot, and good texture on the sides from the paddling.

Tea bowl in Carbon Trap Shino, by Lily L
9) This little cup is also nice, but doesn't have the full range of colours, and is missing the metallic sheen.  But it's still sweet, I think, as long as it is not being compared with its siblings.

Hand coiled bowl in Amber Celadon glaze, by Lily L
10) I formed this little coil bowl on our first day of class, when I didn't want to get a wheel dirty in the remaining workshop time, and finished during our second day of class.  I'm really pleased with the result, and hope to make more in future.  It was formed by a combination of large coils, and smaller plugs which were stamped with my own handmade coil stamp.  I was originally thinking to do something complicated, like stain it and then wipe off the stain for contrast, and only glaze the inside and rim and root...  But fortunately my classmate, Rob, suggested I just use a glaze which shows off the texture, such as this Amber Celadon.  I think the result is quite nice, the bowl has a good feel to it, and it certainly was a lot less time consuming.  I think I gave it an extra dip on the rim and foot, which is why the Amber Celadon is a bit heavy on the top, and almost dripping down.

11) This is the Warren MacKenzie inspired drop-rim bowl which I was able to manage on first try, although it did form a hairline crack on the back of the dropped rim while drying (which the glaze has covered).  I'm not sure I really love the result, and my teen commented that it looked like a dog bowl.  Hmmm.  What I absolutely do LOVE is the triple ringed foot.  I think that's a great foot, and something I will want to repeat again.  I also like the Amber Celadon on the outside / bottom of the bowl.  I was thinking dark so it would hide in the shadows, and help with that illusion of the bowl hovering over the surface.  But something is lacking in the Bamboo glaze on the inside / top.  At least in my opinion.  Maybe this one will find a good home somewhere.  Probably not at my house, since we don't even have a dog.  Not a real one, anyhow.  (Our little wooden dog, Cocoa, doesn't need a bowl.)
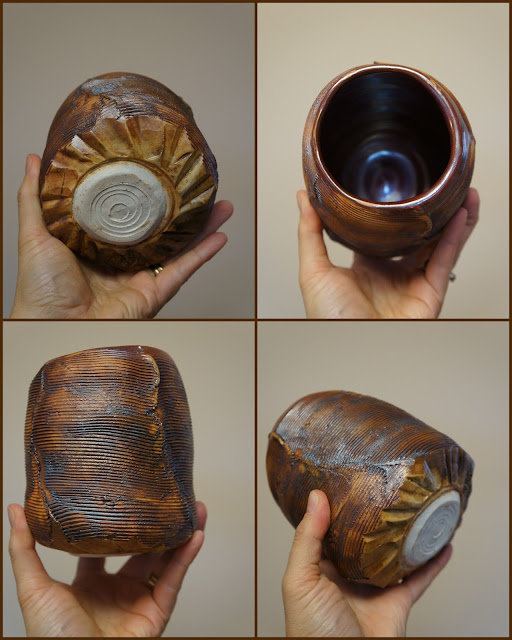
12) This is one of the two first attempts at making a twisty vase, before I figured out how to make them twist.  So I think of it as my untwisty vase.  I had a bit of trouble trimming this one, so I devised a pretty cool hybrid foot, partly trimmed on the wheel, and partly just trimmed away by hand.  The result is pretty neat, I think.  This one I glazed with Khaki inside (my dark chocolate colour!), and with iron oxide and a spray of Gerstley Borate on the outside.  It has a nice earthy, raw, textured feel to it.

13) This is my other "untwisty" pot.  It is finished in Carbon Trap Shino, which I gently wiped off (although I don't really see the effect of the wiping).  The foot was trimmed by hand into the squared off shape.  A nice pot, even if not what I was trying to achieve.

This is the end of the finished pieces so far.  I have another 5 twisty pots which I didn't glaze yet (partly since I ran out of time, and partly since I wanted to see how these untwisty ones turned out first).  I also have my carved pieces (the flower bowls and plates, and hole-punched sphere) which I am saving for the raku firing.  Although I won't be able to raku fire them all, so will need to decide how to glaze and finish them all.

Stay tuned.  I have photos from the first class, working with red stoneware, but am too tired to post now.  So far they are all planters or additional pieces for more garden totems.

First Blooming of my Dove Tree, and Garden Totems

This morning I made such a wonderful discovery, that it is worthy of posting on both my garden blog, as well as my pottery blog.  My young Davidii involucrata tree (dove tree or handkerchief tree), which I bought only 5 years ago as a small twig, and was prepared to wait up to 10 years for blooms, has had its first blooms this year.

Here is a photo of the young tree in bloom, with my small garden totems on either side.  It was a very overcast morning.  I look forward to taking more photos on a brighter day.
Young Davidii involucrata tree (dove tree or handkerchief tree) in its first bloom.
To read and see more, visit today's post on my gardening blog.

Wednesday, April 6, 2016

First Finished Ceramics from Pottery Tools Course

We had such a good time in our last course, making pottery tools from wood and bamboo and metal and such.  Many of the tools have already become good friends, and have proven useful for throwing and decorating.  We also made a few ceramic tools : anvils, a countersink-like pointy hole cleaner (sorry, don't know the proper name of this tool) and foot trimming disks.

I also experimented and made a number of ceramic items, many of them during the open workshop, since I couldn't pull myself away from the power tools in class to sit at the wheel.  Here's the set I picked up today :
It's interesting that so many of them are a reddish brown, but I have recently discovered the magic of Carbon Trap Shino and Amber Celadon, mostly when making guinomi cups in our Mud in Your Eye class.  Carbon Trap Shino glaze can give some unpredictable results, but some spectacular ones.  This time, it didn't disappoint.

1) This sweet Bartmann jug was actually one of five such jugs created during my Mud in Your Eye course, but I had held back on glazing this one, thinking I would include it in a future soda firing.  But I since decided to go ahead, and I can always make another for a soda firing (I'm signed up for one in July 2016).  This little cutie was created with 1200 g of white P570 clay.  His hair and beard were touched up with red iron oxide, and then he was sprayed with Carbon Trap Shino glaze.  I think the parts where he is more gold/white, around the face, was where I sprayed a bit heavier, and the red/brown was a thinner coat.  There is some of the Shino magic on the rim, where it is a bronzy gold metallic colour.  Love it.

2) This sweet vase was created with white P570 clay marbled with iron-rich Yellow Clay.  The egyptian sprig and the snake handles are mostly the Yellow clay.  It was sprayed with a very light coat of Carbon Trap Shino.  I love how the thin spray of the Shino gives a rich reddish brown, and the marbling shows through as a richer tone of the reddish brown.

3) These little goblets were created at the end of my Mud in Your Eye course, and didn't make the glaze deadline, so I finally got them finished and home now.  I really like how they turned out.  Lots of Shino magic again.  I am particularly pleased with the metallic gold colour which shows quite prominently on both, and on the rim of one of them.  I thought it funny that there was the reddish waist on both goblets, and I realized immediately that this was where I overlapped the glaze when I dipped the two ends of the goblets.  Interesting.

4) I really love this piece, and learned a lot from making it.  For example, you can see from the bottom of the piece (see bottom right photo), that the marbling lines are very distinct.  This is where I used my rib to really clean up the piece after throwing.  On the top part, the marbling is blurred, where I had applied the sprig too hastily, and was not able to clean up with the rib.  It is finished with the dark chocolate colour of Amber Celadon inside, and sprayed on the outside, probably a bit too thinly, with Gerstley Borate.

5) I love this one also.  It was created in a similar way, but I think for this one, I remembered to clean up the marbling before adding the sprig.  It is finished with Amber Celadon inside, and then Amber Celadon sprayed lightly on the outside, so the marbling would still show through distinctly.  I really like that colour combination.  I don't know what happened on the rim, that I ended up with that pitted texture.  Perhaps I added another dip of the Amber Celadon, but don't know why it ended up reacting that way.  but it adds interest to the piece.  I really like that grape leaf sprig.

I would love to keep going with my other photos, but I'm very tired.  I had a wonderful first class of my Garden Pottery course, but it was also physically challenging (I threw one piece which was 10.5 pounds!).  So I think I'll need to save the remainder of the photos, and the photos and notes from today's class, until another time.

Thursday, March 3, 2016

Final Trimming and Glazing in Pots and Tools Course

Last week I finished all my trimming, and this week all my glazing (for anything which has come through the bisque firing).  Sadly, our Pots and Tools course has come to an end, so now it's just a wait until the pieces are fired and available for pick up, and a wait until the next course, a garden themed one, starts in April.

I was now sure how I would trim the twisty pots, but with the help of a chuck, I was able to center and trim a foot onto the bottoms :


It's not so obvious from this photo, but the trimming didn't remove that rough jagged look, but lifted them ever so slightly off the table, so I will be able to glaze them fairly easily.  I plan to use Gerstley Borate for some of them.

Trimming has always been painful for me, but last week it went relatively smoothly.  I even created a new three-ringed foot, which has some potential for becoming a signature foot for me.  What do you think?  :

I had enough time, after the trimming, to play with some of the bowls I threw with sculptural clay, which I plan to use for raku firing.  Since they are not supposed to be used for liquids, I decided the best way to avoid this may be to pierce them.  So I carved and pierced the 2 shallow bowls / plates, and 2 rounder bowls, with a floral design :
I'm pretty pleased with the results.  I am hoping that with the raku firing, rather than our usual Cone 10, I will be able to get some brights reds and yellows.  Based on my experience and results from the last one-day drop in raku session, it should be possible.

This week, in addition to glazing, our class made some hole-poking tools, by cutting sections of very narrow metal (copper, I think) pipes.  We made corresponding wood handles which fit inside the pipe, to push out the clay plugs.  (Sorry, I didn't take a photo, and too lazy to make one now.)  So I decided to try these out.  The two that I made performed much better than the hole maker which I had bought, which has a comfortable wood handle, but plugs up easily with clay, and is difficult to dig it out, even with my pin tool.  So here is the result of my hole poking, a candle holder which I also hope to finish in the raku firing :

I didn't want to spend too much time with the piece which I had thrown as a human sculptural form.  So I carved a quick face and dress, and will consider her done, I just need to glaze her.  She has a hole in bottom and top, so can be a piece for my garden totems, as I hope to build more totem pieces (see one of my two totems from last year here) in my upcoming course.  Here she is :

Next time I post, I hope to have finished pieces to show off.  Stay tuned.

Thursday, February 18, 2016

More Twisty Magic and Warren MacKenzie Inspired Pottery

Yesterday was a brilliant but exhausting (in a good way) day at pottery class.  Here are some of the highlights.

After last week's success with the twisty pots, I decided to try another, this one with white clay (my favorite is the Plainsman 570).  Again, I started by, forming the tall volcano, and flattening the sides, and decorating with black and turquoise slip, not worrying that the turquoise dripped a bit :

Then I scraped the sides :

For the scraping, I borrowed my friend Cindy's new scraper tool, which was sold as a cake decorating tool for $2 in a sort of Asian dollar store.   Nice find.

I was happy to try it out for her, so used 3 different edges, for 3 different textures.  Then I inserted my hand and the magic happened :
Twisty wheelthrown ceramic pottery by Lily L.
I think this is my best yet.  Nice bulgy belly, great color and texture, and the rim stayed intact.

I will have LOTS of trimming next week.  It will be our last chance to finalize anything before the bisque deadline, and then the following week we will be glazing before the glaze deadline.  It goes too fast.  Good thing we're done in March, and we start again the next term in April.  I am taking another course in pottery for the garden, probably a pretty close repeat to last year's, but that's fine with me.  I have lots I want to make for the garden also, including more totem pieces and small houses / cabins for my future "lake", etc.

I had a pot from last week which was just too ordinary for me, which I trimmed, and toyed with the idea of altering, but decided to spend more time throwing, so just decorated it in a simple set of slip dots :
The dots are a bit bigger and blobbier than I would have liked, since I decided to test out a hair color bottle as a slip applicator.  At least it didn't clog like my precision applicator sometimes does, and it only blurbed once on an air bubble.

I decided to throw some pieces in sculptural (WSO) clay, since I need 3 pieces for a one day raku firing in May, and that will be upon me before I know it.  So I tried to think of non-functional pieces which I could throw.  I started with one of my favorite shapes, the sphere, and also played with throwing a sort of sculptural piece.  I don't know if I'll continue with decorating "her" or not... (with apologies for a blurry photo) :

I also threw some flatter plates / bowls, which is not a usual shape for me.  I gave them decorative slip-trailed centers, and plan to carve them to be flowers.  Carving so that the recipient will not be tempted to use the sculptural clay (which apparently doesn't hold water well, even if high fired, but definitely not when raku fired, which is at a lower temperature) for liquids.  It could still be a fruit bowl or something like that. (Again, apologies for a blurry photo.)

But after throwing the sculptural clay, which is gritty, I was happy to go back to my white clay, and throw a few more.  Did I mention that I love the P570 white clay?

One of the ideas I saw a couple of days ago, since this week is the 92nd birthday of Warren MacKenzie, and there are lots of Warren MacKenzie photos and videos posted on Instagram, was the drop-rim bowl.  Once finished, it is said to have the illusion that the bowl is "floating" above the table.  So I thought I'd try my hand at it.  How hard could it be to flop an edge?  A little tricky, actually, but here is the result :
Warren MacKenzie inspired drop-rim pottery bowl by Lily L.

I'm very pleased with my progress with throwing, and altering, and making some funky items.  I can't wait to get through the next couple of weeks, and see the final pieces.  Although I would prefer if the course never had an "end", and I could just keep playing, with no deadlines and time pressure.

Wednesday, February 10, 2016

Magic on the Wheel

I mentioned in last week's post the magic which @pradoceramics on Instagram is able to create on the wheel.  Today I was able to re-create some of that magic myself, and I was very excited about the result.  Look at these 4 vessels I created :

I had realized since last week's attempts, that when I threw the initial cylinder, it would need to be thicker and narrower, and when I inserted my hand into it, it should be dry, to create the maximum friction.  That seemed to make all the difference.

The first vessel I created, had a bit of a twist, and some nice texture, which I created with one of the bamboo tools I made in the last few weeks.  That felt really good, to see the tool performing so well.

The second vessel, I was determined to make more twisty, so I brought it in nice and narrow, too narrow to insert my hand at the top.
...but when I did, the result was magical :

For my third and fourth vessels, I decided to play with some coloured slips, turquoise and black.  The first one, I applied the slips while round, and then mucked up the pattern while flattening the sides, so reapplied slip on top, then scraped with my profile tool, as shown in the following photos :

Here is the result, when pushed out (shown with the prior 2 in the background) :

I really like the colours, and the jagged edges / spines.  The rim split a bit also, but I don't know that it bothers me.  This is clearly not a vessel which someone will drink or pour from, so I don't think the split matters, and it suits the rough and jagged nature of the rest of the vessel.

With this success, I was excited to squeeze in another try, even though I was getting tired by that point.  But I'm glad I continued.  Here is the vessel with the slip (I remembered to apply it after I flattened the sides), then scraped, and finally the pushed out vessel :
Many people commented that they liked the colours of this one the best.  A little more subtle, but still much more interesting than the single clay body.  As you can see in the final photo, my bat-mate gave out its hold while I was pushing out the vessel.  So at first I pushed out quite out of shape (bulged to one side), but then I was able to slide the bat back into roughly the center, and pushed again, and straightened it out.

Here are the top three again :
...and from a different angle, since I just can't get enough of looking at these :
Next week I hope to trim up the bottoms, without losing too much of the texture and pattern.  I can't wait to see the finished product.  Not to mention, I will likely try more of these, considering the success I've had so far.

I have a few more items on the go, including more tools which I made in the morning.  Here is a peek at the other vessel, which I started two weeks ago, to which I added handles today.  The handles I had created last week broke, so I went with a "plan B" :
I went back to a snake-handle design, which funny enough, was one of the first handles I made, way back in my second ceramics course, in 2013, which was all about handles.  Check out this post, just for fun, for my snake-y handles.  This time, I gave the snakes extra-noticeable texture, even if not a realistic snakeskin texture.

Wednesday, February 3, 2016

Trimming and a Bit of Throwing

Today was a very busy day, in a good way.  Except that trimming seems so time consuming, and yields so little progress.  But I was happy to be able to trim :

1) All 3 tea bowls.
2) The 3 anvils - although I trimmed through 1 (first time for me), so will end up with only 2.
3) The 2 other tools, which I'm not sure what to call them, but they have pointy ends for cleaning up the edges of holes.
4) My set of 11 discs, of progressive sizes (cut from a tall pyramid), which are useful for trimming feet.  I borrowed one of Jay's bisqued discs today, and found it to be useful when trimming.
5) The 3 marbled pieces from last week.

Here are some of my pieces, which I remembered to take a photo of:

I already suspected it, but I learned that I should have held back on applying the sprigs last week to my marbled vases, since the marbling came out much crisper in the parts I trimmed.  I should have been able to trim and use my rib over the whole piece, then apply the sprigs.  Next time.

I applied a sprig, and hope to add handles to the marbled vase which I flattened.  I'll try to take a photo next week, when it's done.

I had enough time to throw a few more pieces.  I was inspired by Jose Domingo Prado (@pradoceramics on Instagram).  In particular, his wonderful twisted vases like this one :

He was wonderful enough to share videos of how he makes them, so I decided to try my hand at it.

So I made 3 attempts.  Not too much success, but partial.  The first one, the vase was too wide, so I just kept it.  The second one, I threw a cylinder :

Then I flattened it to have 4 sides :

Then gave it some texture :

Then I was able to push my hand in, and push out the sides, but it didn't twist, as Jose Domingo Prado demonstrated.  So tried another one that was more narrow, and with thicker walls, so I could push harder on it.  This is the result :

Ha ha, not quite the effect I was seeking.  I suspect his was a bit more firm, before inserting his hand, so they didn't just mush out easily like mine.  Neither vase is an award winner, but interesting enough, and attracting enough attention (people wanting to know what I was doing) so I'll probably try again.  After I watch Prado's videos again.  :-)