It may have only been 4 hours today, but it was a wonderful afternoon with my hands in clay. I was glad that my family agreed to let me go, and I wanted to make the best of it. As usual, I was quite productive. This time, making eggs.
I made 5 eggs, and then dried them just enough with the hair dryer to be able to flip and trim them by the end of the session. They dented a little, but I was able to smooth them over with a chamois.
The two vessels from Wednesday, shown in the photo at the top, were also not dry enough to trim. So I force dried the round one enough to trim it, and put the other one back in the cellar for another time. As I mentioned before, I am thinking to use these for the raku firing. The bulbous one, I plan to use thin strips of tape to create some sort of diamond or mosaic pattern, and then use different glazes in between. The round one, I don't know if I'll glaze in a similar manner, or pierce it, to create a candle holder. I find the candle holders to be quite practical. Like this beautiful candle holder which I made for my sister.
Anyhow, I decided to bring a few eggs home, as my experience has been that if I leave clay eggs in the kitchen long enough, they tend to hatch, as experienced here, and here, and here. Sure enough, one has already started hatching tonight :
What do you think? I think I'll be happy if they all hatch. :-)
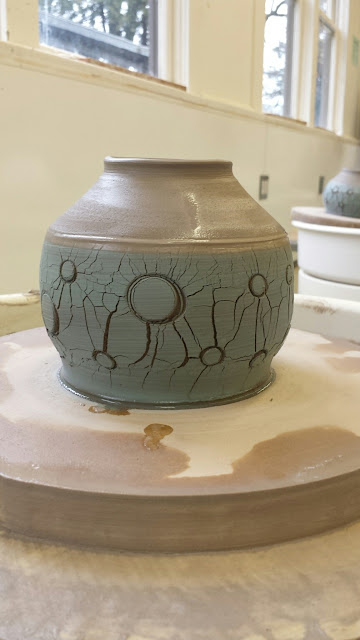
Oh, and I should add that I checked out my crackly planter. I was thinking to add feet to it, but when I checked it out today, I thought it looked quite fine the way it was, so I decided not to mess with it.
Sunday, January 29, 2017
Wednesday, January 25, 2017
Third Garden Pottery Class
I have been on a productive streak in the first class and continued in the second class, and that same productive streak continued again today.
First I trimmed and stamped the two pots from last time, and allowed myself permission to recycle the third pot, that wonky one, which I started to trim today, but trimmed through on one side.
I'm still loving these double/triple feet, one of my "signature" features :
It has been fun trying to fit in my stamp on the edge of the pot, after trimming. The sodium silicate part is too stiff, so the only place for the stamp is on the foot itself, or the edge of the foot.
Then I decided that I'm having so much fun, and such good results, with the sodium silicate, that I should throw a few more while it is available. I ended up throwing 4 more pots, each one successively bigger than the previous one, and so beautifully crackly :
Three of them feature the "plum blossom" stamps, and one of them various sizes of circles. Today I used green slip on three of them, and then for two of those, I touched up the stamped shapes with white slip. It will be fun trying various ways of finishing them also, staining some, glazing others, and glazing only the stamps of others. I am glad I threw more pots, so I have more options for experimenting now. Also, I am very pleased with how these turned out.
A lot of my photos today turned out shaky, but here is a closer view of the one on the right, before I added the white slip. And I wish I had a better photo of the one at the back, it is a really outstanding shape and size (2600g of clay).
I decided again to "push" these, drying them with the heat gun so that I could also trim and finish them this class. Some of the bottoms were fairly thin, so they were not suited to the double or triple foot, so instead I trimmed a foot, and then gently pushed in the middle, rather than trimming it more. That seemed to work very well, with the clay so fresh (not even leather hard yet).
Here are some photos from the trimming :
A lot of students were trying to make a shallow bowl / bird bath using sodium silicate on a thick slab, and then whacking the slab to stretch it out and resulting in the crackly effect. I tried it, but my clay (the H550 grey clay) didn't respond well to the sodium silicate, the slab just crumbled to pieces, not even allowing me to pick it up.
I tried it a second time, with a very thin layer of sodium silicate, and was able to pick up the crumbly slab, and lay it into a bowl, with the crackly side out. It split in a couple of spots, which I repaired, and then I reinforced along the rim, which was splitting also, and the result may be a pretty cool planter, if it holds together through drying and bisque firing. I even hope to add stubby feet next week, if that is possible. But I'm not worried either way, it was just an experiment. If I do it again, I'll use a different clay, such as the WSO sculptural clay, which will surely hold up better :
Speaking of WSO sculptural clay, I need to make 3 pieces to fire in a one day raku course in early March. So I've had a bag of WSO sitting and waiting for me for a couple weeks now. I have some great ideas for sculptural pieces, one involving a penguin, but they will be quite time consuming, and definitely more than the time I had remaining in the class. So I decided to throw some simple vessels, which I could decorate using different glazes, and using a fine tape to delineate areas (which results in the sharp black lines which I love so much : see my floral bowls from the last raku firing and the pierced candle holders from the prior raku firing).
I guess I forgot to take photos, but I ended up with two shapes, one a large bulbous vase, with a short straight neck, and another the round almost spherical shape which begs to be pierced or carved and used as a candle holder. I will trim these next week, and then decide how I will finish these.
Wednesday, January 18, 2017
Second Garden Pottery Class
Last class, I threw a whole bag of Plainsman H550 grey clay, creating 7 items, and finishing 5 of them. This class, I again threw a whole bag of H550 clay, creating another 7 items, finishing 4 of those, as well as finishing the 2 from last class.
This time, I played mostly with sodium silicate, to create a crackled effect, and the interactions with some stamps and small shape cutters. I was very happy with the results.
Here's a glance at a few of the new pieces, and the two I finished off from last time (back right corner) :
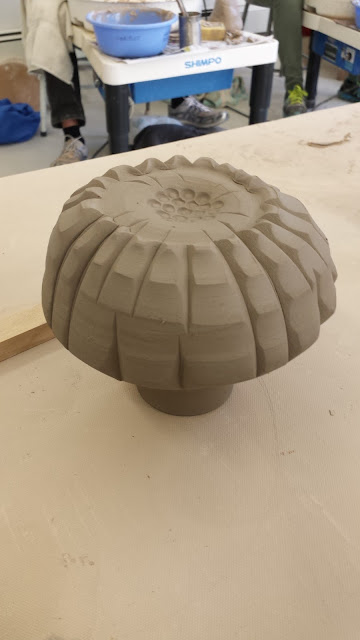
I like how that carved vase turned out. It was a vase I threw toward the end of last session, and the neck didn't turn out too well. But rather than cutting it off even, it inspired me to carve this flowing pattern into it. Here it is from another angle :
I've thrown with sodium silicate before, but this is the first time I've introduced the stamps/cutters, inspired by a ceramic artist, Rob Haenszel (https://www.instagram.com/haenszeldesigns/) on Instagram.
This is the first pot I threw :
I love how the plum blossoms pop, and the crackles emanate from the flowers, like electricity.
I left a good amount of clay above the part I treated with sodium silicate, so I could add a proper neck to the vase, making it almost bottle shaped. I am so pleased with this piece in so many ways :
The second vessel also features the plum blossoms, but I applied turquoise slip before the sodium silicate :
Then I tried simple circles also, made with my hole cutter tools (the smaller of which I made in my Pottery Tools course last year) :
For fun, I tried one of my clay stamps, which wouldn't cut through the sodium silicate, but press and weaken that spot :
When pushed out, it also had a different, but pleasing result :
This one seemed to beg for a bit more, so I added another line near the rim, and then I toyed with pushing out that section with sodium silicate also. I debated, and then decided to give it a go. Although I don't know that I like the result better, it was interesting to observe and feel the effect at my fingertips. It was interesting to me that the cracks travelled toward the rim. Perhaps if I had re-moistened that part, it would not have cracked as it did. I'll need to try that another time :
Then I decided to try white slip, and return to the plum blossoms again. It may be fun to underglaze/glaze the flowers on this one, in a bright colour like red :
And finally, I tried alternating panels of regular clay, with clay coated with sodium silicate and stamped. Here is the "before" photo :
...and the "after" photo :
It's interesting how the seams look like they are completely split, yet the clay didn't crack through, it is just the outside surface which split like this. But I ended up needing to go easy on the pushing (so I didn't get as much cracking as I had hoped) since I didn't want to break through those seams.
I also had one pot which went badly off center, so I ended up making it completely wonky ("wabi sabi"), and will take another look at how to finish it next week. If it has good potential, I will trim it, but if not, I may just recycle the clay. It is a rare moment when I do that, but I need to learn how to allow myself that option sometimes.
I decided to force the pieces with the dryer, and try trimming some of them this week. Partly because I'm an impatient person, and I don't know what I may have moved onto next week, and partly because I figured this may give me good control over the dryness of the pieces. I dried the tops enough to flip them into a chuck, but left the bottoms quite wet. Even then, it was quite difficult to trim through the sodium silicate, which runs down and pools at the bottom of the vessel, no matter how much you try to apply only a light amount with the brush. I ended up pretty much cutting off the stiff outer layer with a pin tool before using my trimming tools to do the actual trimming.
Here is one of the pieces, after trimmed, with my signature double foot :
I think that turned out quite well.
And another one, this one with a blurry photo :
And finally for tonight, here are the 4 finished pieces, left on the shelf in the drying cellar, where they should dry fairly slowly, considering the heavy rain we've been having these past few days :
Oh, and I try not to post photos of other student's work unless it is on exhibit, but I can't resist to post this beauty that I spotted in the drying cellar also. Wow. I love working in a place which is so full of inspiration - and great people, too.
I can't wait to see what I get my hands into next week. And in the back of my head, I know I need to switch over to sculptural (groggy) clay and make a few pieces for the raku workshop coming up in early March. But I am waiting to see where inspiration takes me. So far none of the pieces in the last 2 weeks have been particularly suited to raku firing. The totem pieces could work, but I don't want to "waste" the raku firing on an outdoor piece.
This time, I played mostly with sodium silicate, to create a crackled effect, and the interactions with some stamps and small shape cutters. I was very happy with the results.
Here's a glance at a few of the new pieces, and the two I finished off from last time (back right corner) :
I like how that carved vase turned out. It was a vase I threw toward the end of last session, and the neck didn't turn out too well. But rather than cutting it off even, it inspired me to carve this flowing pattern into it. Here it is from another angle :
This is the first pot I threw :
I love how the plum blossoms pop, and the crackles emanate from the flowers, like electricity.
I left a good amount of clay above the part I treated with sodium silicate, so I could add a proper neck to the vase, making it almost bottle shaped. I am so pleased with this piece in so many ways :
The second vessel also features the plum blossoms, but I applied turquoise slip before the sodium silicate :
Then I tried simple circles also, made with my hole cutter tools (the smaller of which I made in my Pottery Tools course last year) :
For fun, I tried one of my clay stamps, which wouldn't cut through the sodium silicate, but press and weaken that spot :
When pushed out, it also had a different, but pleasing result :
This one seemed to beg for a bit more, so I added another line near the rim, and then I toyed with pushing out that section with sodium silicate also. I debated, and then decided to give it a go. Although I don't know that I like the result better, it was interesting to observe and feel the effect at my fingertips. It was interesting to me that the cracks travelled toward the rim. Perhaps if I had re-moistened that part, it would not have cracked as it did. I'll need to try that another time :
Then I decided to try white slip, and return to the plum blossoms again. It may be fun to underglaze/glaze the flowers on this one, in a bright colour like red :
And finally, I tried alternating panels of regular clay, with clay coated with sodium silicate and stamped. Here is the "before" photo :
...and the "after" photo :
It's interesting how the seams look like they are completely split, yet the clay didn't crack through, it is just the outside surface which split like this. But I ended up needing to go easy on the pushing (so I didn't get as much cracking as I had hoped) since I didn't want to break through those seams.
I also had one pot which went badly off center, so I ended up making it completely wonky ("wabi sabi"), and will take another look at how to finish it next week. If it has good potential, I will trim it, but if not, I may just recycle the clay. It is a rare moment when I do that, but I need to learn how to allow myself that option sometimes.
I decided to force the pieces with the dryer, and try trimming some of them this week. Partly because I'm an impatient person, and I don't know what I may have moved onto next week, and partly because I figured this may give me good control over the dryness of the pieces. I dried the tops enough to flip them into a chuck, but left the bottoms quite wet. Even then, it was quite difficult to trim through the sodium silicate, which runs down and pools at the bottom of the vessel, no matter how much you try to apply only a light amount with the brush. I ended up pretty much cutting off the stiff outer layer with a pin tool before using my trimming tools to do the actual trimming.
Here is one of the pieces, after trimmed, with my signature double foot :
I think that turned out quite well.
And another one, this one with a blurry photo :
And finally for tonight, here are the 4 finished pieces, left on the shelf in the drying cellar, where they should dry fairly slowly, considering the heavy rain we've been having these past few days :
Oh, and I try not to post photos of other student's work unless it is on exhibit, but I can't resist to post this beauty that I spotted in the drying cellar also. Wow. I love working in a place which is so full of inspiration - and great people, too.
I can't wait to see what I get my hands into next week. And in the back of my head, I know I need to switch over to sculptural (groggy) clay and make a few pieces for the raku workshop coming up in early March. But I am waiting to see where inspiration takes me. So far none of the pieces in the last 2 weeks have been particularly suited to raku firing. The totem pieces could work, but I don't want to "waste" the raku firing on an outdoor piece.
Thursday, January 12, 2017
Back in the Studio Again
Yesterday was my first day back in the pottery studio, and I came home sore and tired in all the right ways, and so very happy. It seems it has been a long time waiting to get back to it, so I am so glad to be back, even if I can still only spend one day a week doing pottery.
I had to be a bit patient with myself, since I am still a beginner at the wheel, and I needed to get my confidence back. So I'm glad our instructor, Jay, had us starting with some totem pieces. I'm happy to throw more pieces, since I have some finished from last year, but not enough to add a third totem to the garden yet. And any pieces, no matter what shape, can be a totem piece, with the addition of holes at two ends.
I ended up throwing 7 pieces, and then drying them a bit with the hairdryer so I could trim and finish 5 of them already. I ended up finishing the whole bag of Plainsman 550 grey clay.
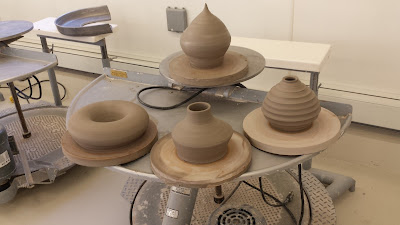
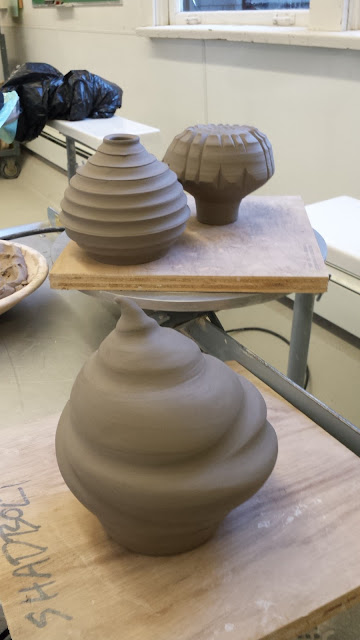
Here are the first 4 pieces, just after throwing them :
The one on the right, I threw with holes on both ends already, to be a totem piece, and altered it while still in the wheel, to have a bit of a pattern. I hope to pick a glaze which will accentuate rather than hide the rings.
The one at the front, was meant as a garden ornament (upside down) or totem topper. I intentionally created a few ridges in the shape, so I could alter it with a stick, to get something like this:
Not quite what I had in mind, but I still like the outcome. Good enough for the garden, anyhow.
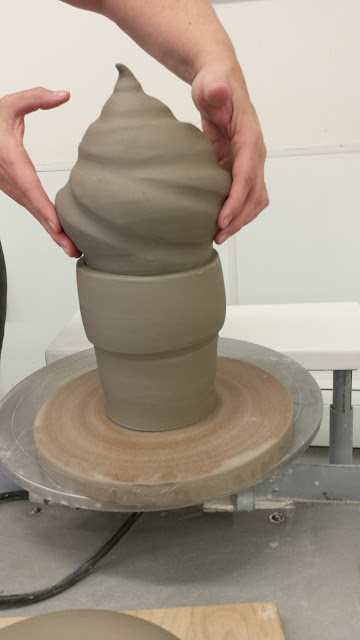
The shape at the back was originally going to be an acorn, thrown with the pointy side down, and the cap at the top. But half way through throwing it, I managed to push the piece right off the bat. So after that, it was too wonky to finish as an acorn. It looked more like it wanted to be a swirl of soft ice cream. So I helped it along a bit :
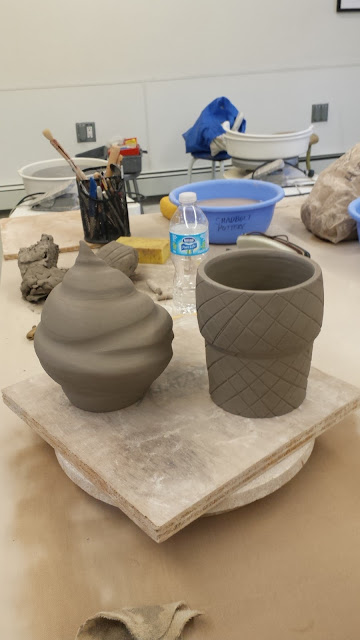
It has a hole in the base, so it can become a totem topper. But then what is an ice cream without a cone to sit it in? So I threw a cone, also with a hole in the bottom, to sit on a totem :
Then I added a bit of texture to the cone, so it didn't look like a flower pot :
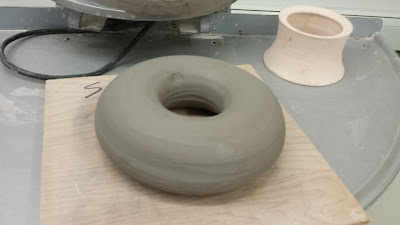
The donut was a challenge to my throwing abilities. I have made a donut in the past. And then I've made a few pieces which were supposed to be donuts, but ended up not closing up, so becoming succulent pots, etc. So I was pleased when I was able to make this donut close up. And again I forced it to dry enough so I could trim and finish it :
I've already added holes in it (not shown in the photo) to mount on the totem also. Instead of centering the holes, so the rebar pole will show through, I added holes to one side. So then it needed another totem piece which would sit at an angle to it (perpendicular to the donut), and threw another circular piece (not shown). And also a vase / jug, to practice bringing in the neck, which is still a challenge for me at times.
The vase turned out a bit wonky at the top also, so if I'm up to it, I'll play a bit with it next week, and alter it. But then again, I have some ideas in my head for some sodium silicate crackly pots, and Jay is talking about showing us that next week, so I suspect that will keep me busy instead. We'll see. I also want to make something bowl-like with a large ceramic mold he has available.
Monday, January 9, 2017
Triangle Platter on Display
When I stopped in at Shadbolt Center before the holidays, to see if my final platter was ready for pick up, I discovered it in the display case outside Mathers House (the pottery studios). At the time, the windows were foggy, so I wasn't able to get a good photo. So when I passed by there recently, I snapped a few :
It is fun that it shares the shelf with that complicated two-piece sculpture created by that encouraging young man I mentioned in a prior post :
It is fun that it shares the shelf with that complicated two-piece sculpture created by that encouraging young man I mentioned in a prior post :
I seem to remember it was meant to represent a water tower. And he was unsure whether the pieces would fit together well. But it seems it turned out okay, and his many hours were rewarded not only with a nice piece to take home, but some public display time also.
My Pottery Finding A Good Home
It is a great feeling to know that your work has found a home where it is loved. This Christmas, I had the joy of sharing two of my pieces with my friends Holly and Melanie. They captured these beautiful photos of them "in action".
The table is set, candles lit, and the little dragon hatchling looks in anticipation to the dragon scale platter, wondering what will come next ...
Then the platter is filled with delicious Korean BBQ chicken and roasted garlic...
For a moment, there is a stillness, as the diners wait politely, savouring the delicious scents...
And then they dive in, and there is no time to take more photos.
Thanks Holly and Melanie, I hope this platter enjoys many more feasts in your home.
Subscribe to:
Posts (Atom)


