Wednesday, February 26, 2014

1st Five Finished Items from "Pots That Pour" Course

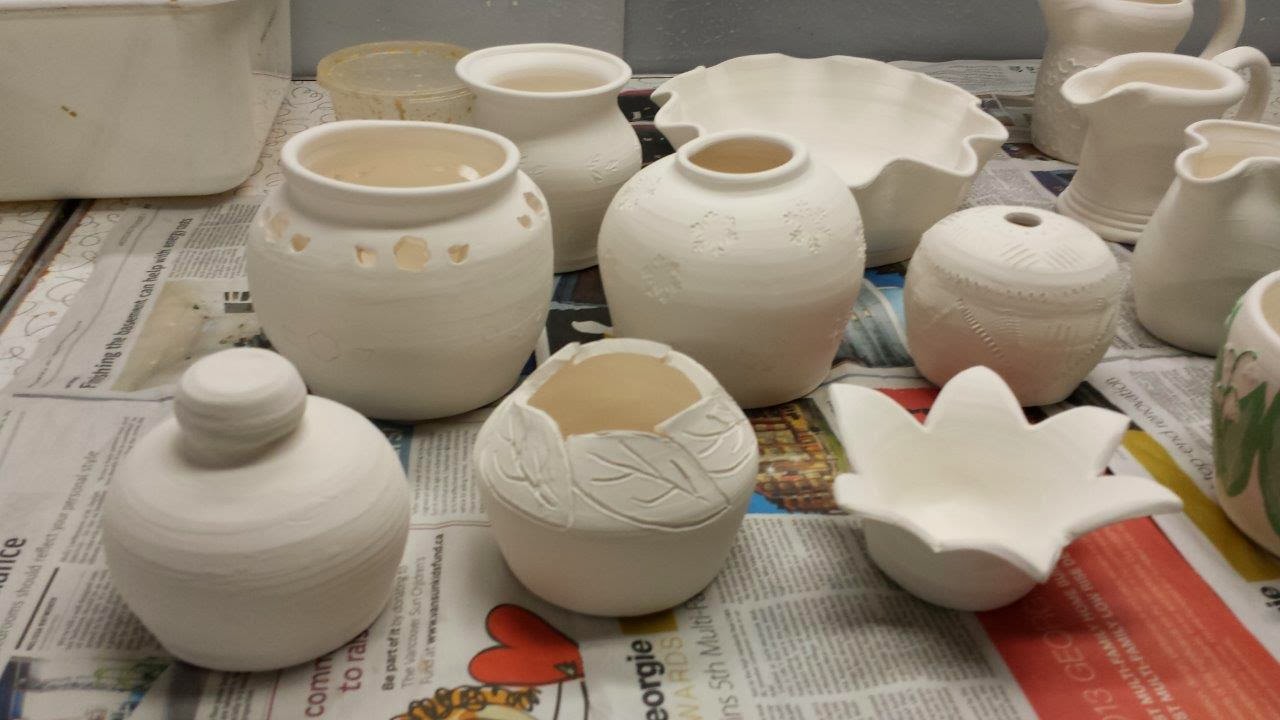
Today was a long, but productive day.  I ended up throwing 9 pieces, many of which need to be finished next week, and then after that, there is only 1 more class in which we'll be glazing anything we have left.  Wow, the course goes by quickly.

The load of finished items just came out of the Cone 10 glaze firing tonight, as we were leaving.  I found 5 of the 10 pieces I had glazed last week, and brought them home already.

I was really happy that Fredi (the instructor that I admire and hope to take one of her classes some day) asked me if I would be able to provide one of my teapots (the ones with the flower cutout for a lid) for a student ceramics display.  That would be awesome.  I'm very honoured.  Now I need to make sure I glaze them well!

I should note that in general, I feel a bit frustrated by the glazing process.  I am still learning how the glazes behave, and most of the time, it is not how I had hoped they would.  So the pieces end up still being "nice", but not nearly as spectacular as I had imagined when I picked out the glaze combinations.

1) This little piece started out as a bowl which failed during throwing, so I ended up cutting off the damaged top in a lily-like shape, just like #26 from the last course.  But in this one, I decided to make it look more intentionally like a lily, with red petals and yellow throat.  The closest I could find in our Cone 10 glazes was to paint the inside (throat) Bamboo, then wax it over, and dip the piece in Copper Red.  I remembered to add freckles of Black Overglaze.  I am please that the freckles showed up well.  I am not impressed by the Copper Red, it is too milky for my taste, but overall I like the piece.

2) This one also started as a failed bowl, which I cut, as you saw in my previous posts, this one after cutting, and this one the glazing.  I painted and then scraped off Tenmoku in the lines of the leaves.  Then brushed the leaves with Matt Green, waxed them over, filled the inside with Bamboo, and dipped the outside in Deep Blue.  I like the Bamboo and Deep Blue combinations.  I'm not sure the Matt Green on Tenmoku was the best combination, it didn't come out clearly.  Perhaps Deep Blue would have been a better companion to the Matt Green.  The Deep Blue came through very nicely in Fredi's demo items.  So I'll know for next time.

3) This is another of my signature lily-of-the-valley vases, but instead of finishing in Clear like I did last time, which caused the flowers to show pure white, I decided to dip the bottom (soil line) in Matt Green, then dipped the whole piece in Celadon.  Which gave it a slight greenish hue, and the whole thing looks a bit too faded to me (compared to the unglazed colour of the Green slip, shown at center).  Again, a learning experience.

4) This is the first of a set of 3 small pitchers I created, with a pinched spout.  This one was the simplest shape, so I hoped to make it more interesting with the glazing.  It is interesting, but not in the way I had expected or hoped.  It was dipped outside in Khaki, then the whole piece dipped in Clear.  I like the Clear glaze on the inside, but I don't know about the speckled effect on the outside.  I think this will be a love it or hate it combination.  It looks to me like freckles or measles.  But maybe over time, I will grow to appreciate it.  Or find someone who does.  :-)

5) I'd have to say the glaze on this one may have turned out even better than I had expected.  The original pot (which started out at a whopping 2400 grams, so has a good weight to it) was a very pleasant shape, but a bit too ordinary for my liking.  So I borrowed some flower and leaf shaped punches from my classmate and friend Roma.  As you may see in the middle photo, I also echoed the pattern lower down the pot, but to keep it functional, didn't stamp this through, but just made a small indent.  The top was dipped in Matt Green, and I needed to dip it a few times to get all the flowers covered in green.  Then I dipped the whole pot in Celadon.  I love that effect of the Matt Green bulging and wanting to drip, but being held in place by the Celadon (at least, that's what it looks like).  The effect is very 3 dimensional, but smooth to the touch.  I love it!

I hope to pick up more next week, and have lots more in progress.  Here is a sneak peak of a few items I was starting on today...

I think this bowl is going to turn out really cool.  I had an idea like this way back in my first course, and at the time (Summer) I made a ceramic mold from a leaf of my beloved Davidii Involucrata tree.  It is a tree I fell in love with long ago, but recently tracked down and bought for my back yard.  I call it my "David tree", which is special since my 13-year-old is David, too.  (I can't believe I don't have any more photos of it in my garden blog, since I bought it in 2011!)  Anyhow, I finally decided to test out the mold, whether it worked.  Next thing I knew, I had found this mold for a shallow bowl, and was assembling a leaf-ringed ceramic bowl...  As you can notice in the photo, I started with the tips of the leaves pointing out, but part way along, realized that there would be a good chance those tips would be broken off, so started overlapping them on the adjacent leaf.  I didn't want to go back and tear out the leaves I had places already.  I'm sure this will not be the last plate like this that I attempt.

This one doesn't look like much of anything yet, but it is a bowl formed by a slab pressed onto a beautiful glass bowl (made by Mikasa, apparently the pattern is "Bountiful") with cherries design.  Here is the pattern I am hoping to transfer into the clay:

Okay, enough of the sneak previews, you'll just have to wait for the remainder.  Stay tuned!


Wednesday, February 19, 2014

Another Teapot and First Batch of Glazing

Ceramics class today was a very productive one.  I finished a fourth teapot.  I think it is my favourite, even though I messed up the strainer holes in the spout, and ended up cutting out a full hole inside the spout instead.  No problem, since most people use tea bags, or can always use a tea ball if using loose tea leaves.
I am hoping to get my hands on a bright red underglaze, to highlight the flower-like lid.  None of our cone 10 glazes or glaze combinations can provide a convincing pink or red, or even yellow.

By the way, I was happy to run into Herb today, and show him my teapot, and let him know that his lidded Japanese-style pots which he throws as a closed form and cuts the lid on the wheel, so they have a very precise fit, were the inspiration for me exploring these cut-out lids, in floral shapes.  There are so many talented people that I have the pleasure of working alongside, and I am an unashamed sponge, learning all I can from each person, and hopefully being an inspiration to them also.

After finishing the handle and lid of the teapot, and setting it aside to dry, I started glazing my 12 pieces which have come out of the bisque firing.  I finished 10 of them today.  Very good progress.  Here are some photos of the items before glazing :


I'm experimenting with different glazes and glaze combinations than I have used previously.  So no Matt Green and Deep Blue combinations.  One thing that makes glazing so fun and also bewildering, is that the colour of the glaze when applied is often nothing like the colour of the glaze when fired.  And all of them are very opaque when applied.  So for a newbie like me, it is hard to visualize how the final product will look.  I base my glaze colour choices on the glaze sample tiles on the wall, and my limited experience with the combinations I have tried.  For example, this little one is glazed in Amber Celadon, which looks like a rich chocolate colour - at least on the sample tile.
I was excited to have Fredi as a substitute teacher today.  She is a very talented potter, and I really admire her work, as do many of my classmates.  So it was great to learn some new techniques from her, such as this glazing technique which I already tried out myself.  Remember that little pot that I mangled during throwing, and used the damaged edge to carve out some leaves?
Well, I was planning to glaze the leaves in Matt Green, and then the remainder in a different colour.  But to get the outline of the leaves, I used the technique Fredi demo'd today, which is to apply a thick layer of the first glaze by paintbrush (in this case, Tenmoku, which on its own is a dark brown) :

... then scrape it with a metal rib :

... then to apply a second glaze (in this case, Matt Green) :


... the result is that you will get Matt Green (in the areas scraped clean), and Matt Green over Tenmoku in the other areas.  As you see, I didn't scrape very clean, since I liked the combination colour, at least on the sample tile.  There is good chance the glazes will  run together, but the pattern should still be more noticeable than if I just used a single glaze and hoped for it to pool in the carved areas.

I used this technique in the bottom of a bowl in which I had created a spiral pattern before removing it from the wheel.  In this case, I painted and then scraped Matt Green, and afterward dipped the whole piece in Celadon, which is a very light aqua colour.  Here it is before being dipped in Celadon :
I can't wait to see these pieces emerge from the other end.  Hopefully by next week, so I will learn more about what worked, before deciding how to glaze the next set.

Thursday, February 13, 2014

Ceramics : Where are They Now?

I can't wait to finish up my new pieces, and bring them home.  But I know I will need to find loving homes for many of them, since my windowsills are starting to become full, and I don't think I need 4 or 5 teapots!

One of my ceramics enthusiasts is my 15-year-old's flute instructor, Miranda.  She is a talented musician and music producer, and very creative, fun person.  I was happy to give her one of my early mugs (#5 from my 2nd ceramics course which featured lots of mugs with handles), one with lots of "student" characteristics to it, and was even happier with how she has welcomed this gift.  Miranda sent me photos of both her "urban" home for it :

...as well as her "rural" home for it:

It's great to know that my ceramics are finding loving homes.

Here's a few more photos of my creations.  #31 and #32 sitting on the edge of my mother-in-law's kitchen counter, waiting to be filled with flowers (sorry for the blurry photo):

...and #22 sitting on my kitchen counter, holding a cyclamen which my husband bought for me, specifically since he thought it would fit nicely in that pot.  That was really sweet of him, to think of both me and my ceramics!

Wednesday, February 12, 2014

Third Ceramics Course : Teapots Brewing

We've had 4 classes now in our "Pots That Pour" course, and my ceramics are coming along marvelously.  Today I was particularly on a roll, and everything seemed to work out well.  I made lots of mistakes, as always, but was able to recover from each and every one of them.

Like the lid which I was going to trim and throw a know onto.  I improved a chuck using an unglazed mug on which I threw a ring of clay.  It was something like the instructor had showed earlier.  But I managed to not just trim the lid and throw the knob, but I also managed to fuse the lid onto the fresh ring of clay.  So by the end of it, I had to cut off the lid with my pin tool, which mangled the otherwise nice flange on the bottom.  So I flipped it over and smoothed that off with my smooth sponge.  But when I flipped it back, the top was all messed up, so I needed to smooth that also.  But in the end, it all turned out fine.

Today I felt particularly productive, since I finished 3 teapots, and started into a 4th one.  Here's a sneak peak of my teapots, before the dry and get sent for the bisque firing :

This is the teapot on which I made the mistakes on the lid. But it turned out okay.   I played a bit with some profiles on the side of the pot, so also mirrored those in the lid.  I put a little jib of clay inside, to hold the lid from falling out (if it is oriented correctly).  That kind of detail matters to me, so I think it was worth the extra time.  If I had more time, I would have altered the flange inside the lid (my teapot has the front part of the lid flange flattened out) so it would orient one way.

This was the first teapot I made today, and I was very proud of myself for keeping it pretty simple and clean.  I am so inclined to decorate, I don't like to make plain lines.  So this was a challenge for me.  I managed to tuck in a little extra line on the lid, since I noticed the instructor demo'ing something similar.

This little pot wasn't originally going to be a teapot, but I decided to go for it.  The pot was thrown as a closed container, and then the lid cut out.  I am really hoping to get ahold of some bright red underglaze for the flower petals on the top.  We'll see.  I love this little guy.

This little lidded pot also was not thrown as a teapot.  I think I was trying for the closed form, but didn't manage to close it, so ended up finishing it as a small hole.  Then I decided to make it a lid.  When I picked it up to trim it today, I realized that I already liked the shape pretty much, so didn't trim it down and add a knob, I just rounded it off, and it became a chunky little knob-like lid.  I have resisted the urge to decorate it, so this one is already sent to the bisque firing, and maybe I can already glaze it next week.

I am notorious for not giving up on my mistakes.  I managed to mangle the very top of this little pot (I think I was also going for the closed form), but instead of getting rid of it, I let it dry to leather hard, and then carved a simple leaf pattern (I didn't want to take too much time out of the teapots today), and have sent it off for bisque firing also.  I'm thinking to glaze the leaves as Matt Green, and then wax them over, and glaze the remainder in a shiny glaze.  I think that will look pretty good, for a relatively small amount of effort.

My final photo today is of my wheel, with a failed experiment to throw a small chuck, on which I could sit my chunky lid with the narrow flange.  I messed around with this for a while, and managed to create a pretty nice radial pattern with the clay.  I didn't even notice until my classmate, Martha, pointed it out.  So I decided to take a quick photo before cleaning it off.

Stay tuned.  Next week we start glazing, and then there are only 3 classes left after that.  I have 19 pieces on their way.  I will likely start quite a few more in the next 4 weeks.  So this has been a very productive course for me, indeed.