Friday, February 24, 2017

Finished Items : Triangle Platter and Sodium Silicate Vessels

Before I get into the new items, I want to start with that triangle platter which has been on display at Shadbolt Centre for the Arts for the past few months, and finally came home with me on Monday.

This one was made using one the styrofoam moulds I made in a weekend course in Sept 2016.  I have been very pleased with how these worked out, and hope to make more platters from them in future.

A) This little beauty was made from B-Mix clay, and textured with a roller, as well as a variety of my handmade stamps from a few years back, which have textured a lot of pieces for me.  The texture is highlighted with Deep Blue and Amber Celadon glazes, which were subsequently wiped off, and the whole piece was sprayed Clear.  Which is interesting, since it seems to have a bluish tinge, I would have guessed it was sprayed Celadon.  Since it was created from a slab, it has a nice uniform weight to it, and will make a lovely serving platter.

Now for the new pieces.  All of them bearing one of my signature stamps.

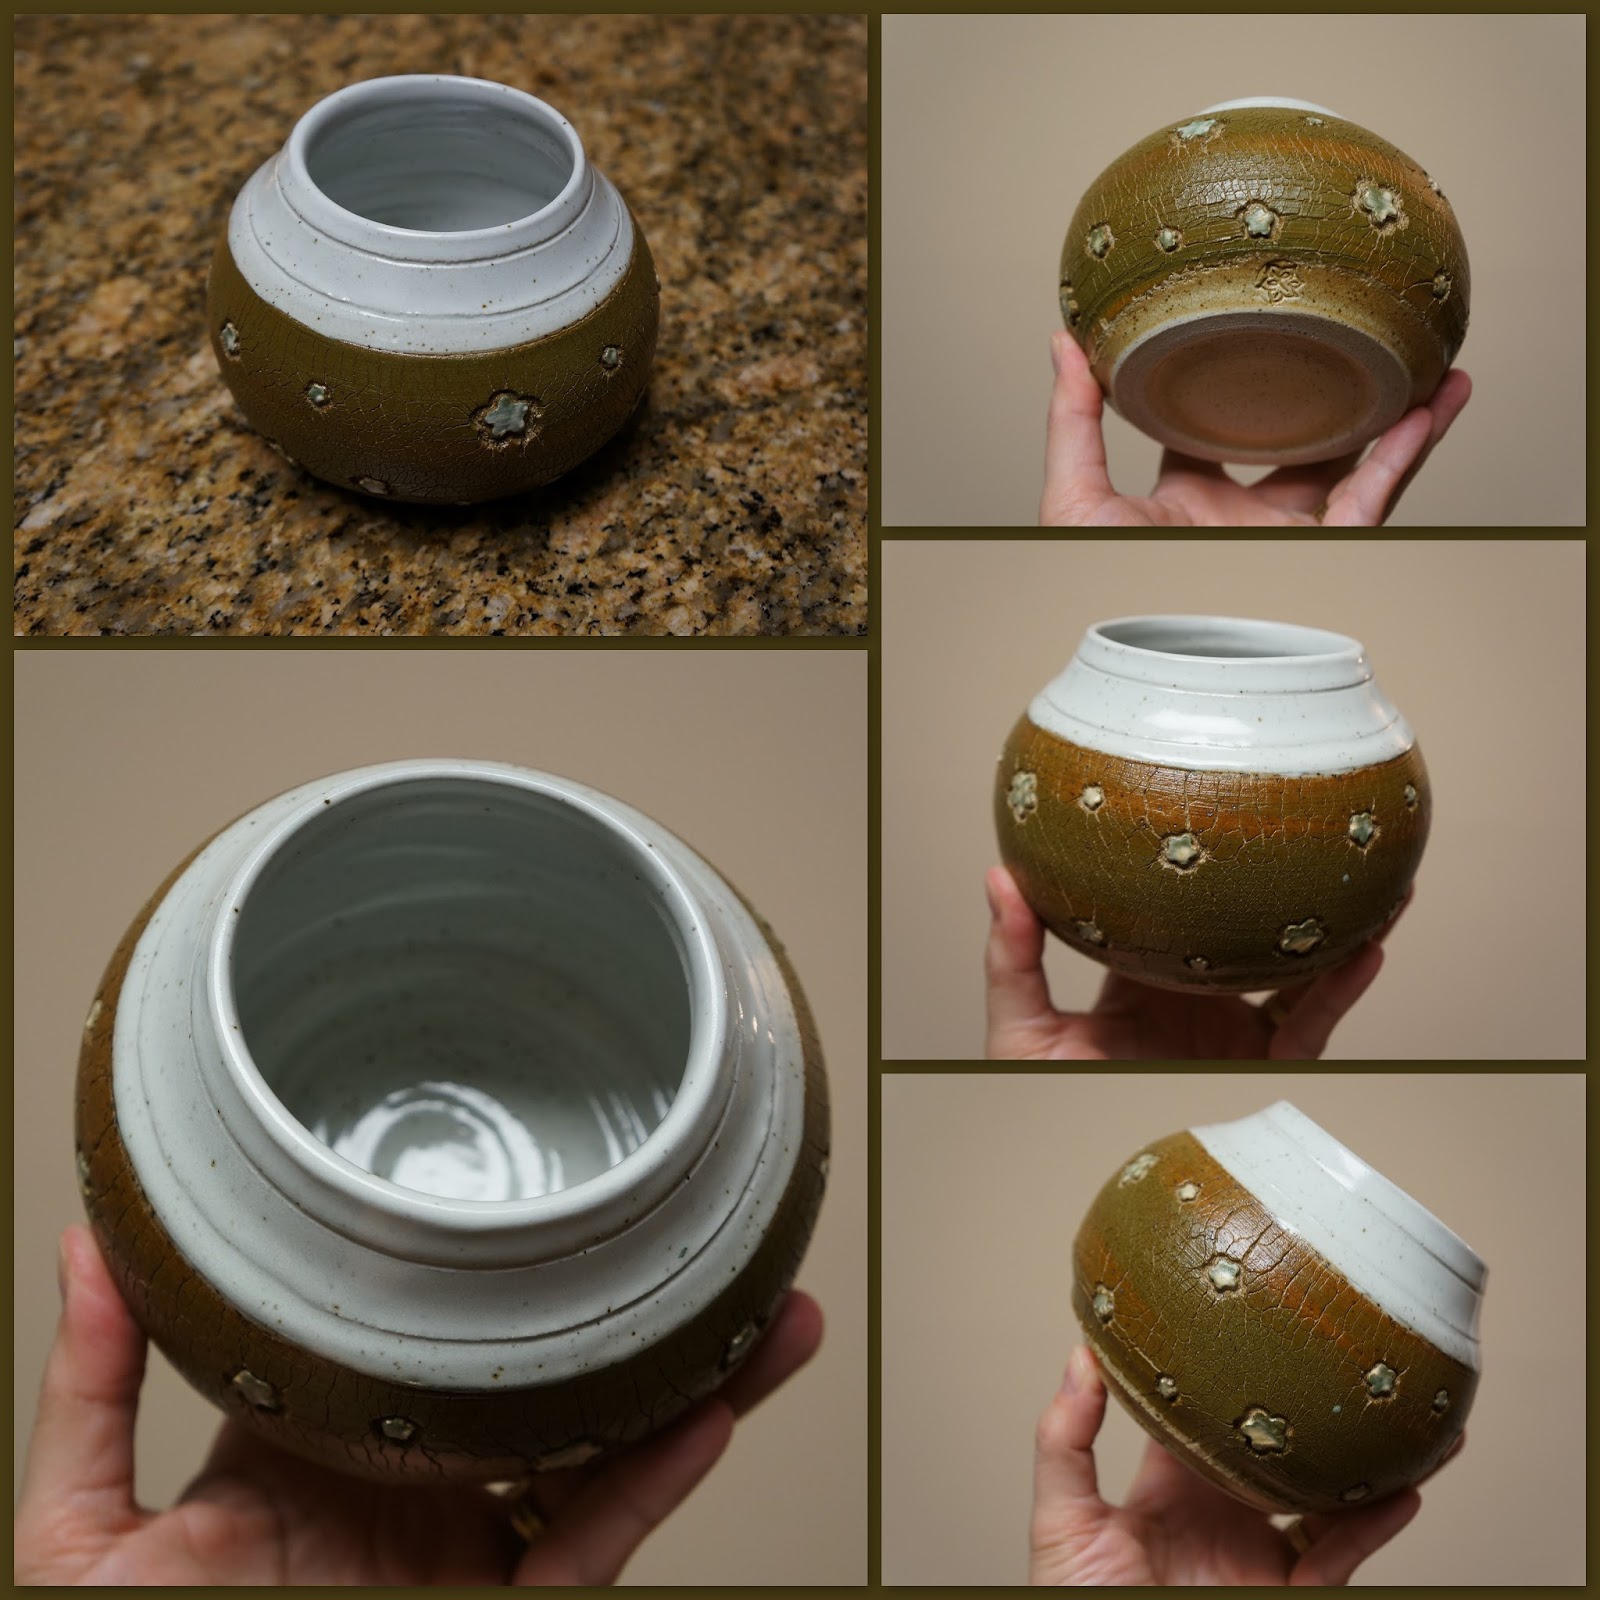
First of all, I have a set of pieces crackled with sodium silicate, and decorated with plum blossom stampers.  I tried to finish them in a variety of ways, so I could discover which ones I liked the best.  These are the first 5 which came home with me on Monday :
And one by one...
1) This one was created using white slip over H550 grey clay.  Once bisqued, I used Forest Green underglaze to highlight the edges of the flowers and cracks.  But I otherwise left the white slip unglazed.  Then it is dipped inside and top and bottom in Matt Green glaze, and the plum blossoms are highlighted in white glaze, so they are shiny against the crackly matte background.  I think this is my favourite of the five.

2) This one was also created from H550 grey clay, but crackled directly (no slip).  My notes and photos indicate that I used Forest Green underglaze again, although I wouldn't know from looking at it now.  Red underglaze highlights the plum blossoms, and it was glazed inside with Matt Green glaze, and the outside sprayed Clear.   I generally like the look, although I would have preferred a more greenish tone rather than the brownish tone which resulted.

3) This one was crackled with turquoise slip, and then after bisque, I waxed the surface lightly and stained the cracks with Black stain.  Then it was dipped inside, top and bottom in Amber Celadon, and the plum blossoms highlighted with Amber Celadon also.  I like that contrast between the matte soft turquoise, and the shiny bold amber celadon.

4) This one was green slip on grey clay, although again I wouldn't have known it if my notes didn't tell me so.  The blossoms were highlighted in white slip.  After bisque, it was glazed White inside and on top.  Then the outside was sprayed in Gerstley Borate, so it has a slight sheen to it, but is not shiny.  I like the feel of this one.  It doesn't feel as delicate and crumbly as the previous 3.  So I think I will glaze / seal my remaining pieces, rather than leaving the clay or slip exposed.

5) This one was also finished with green slip, but has no glaze or seal to it, so it turned out totally different than the previous one.  Fascinating.  It was dipped in Khaki glaze, inside, top and bottom.  I like the contrast, again between matte and shiny, soft and bold.  Although this one is a bit on the dark and brooding side.  I think I prefer the cheery whites and reds.  But that's the whole point of trying different treatments and glazes, to discover what combinations worked for me.  And I wouldn't be surprised if different people preferred different ones also.

I think I'll leave it there for tonight, as it's been a really long stressful week, and I need some sleep now.  I'll post more as soon as I have a chance.

Wednesday, February 22, 2017

Second to Last Class and High Output

It is already our last class next Wednesday, so today was the deadline for getting anything in the bisque firing, and then glazing next week, otherwise they will need to wait until next term.  Which is not so bad.  But I still want to finish what I can.

I pulled out the 7 marbled items which I threw on Sunday, to trim them, but they were still too wet, so I decided to throw a few more sodium silicate pots.  Especially since my star stamps arrived in the mail, and I wanted to try a new technique of mixing the sodium silicate directly into the slip before applying it.

I ended up throwing 4 pieces.  Here are a few photos :
This is the first one, using the star stampers.  The slip was a mixture of black slip and textured slip.  It ended up pretty thick, so I applied it to the pot with the back of a spoon.

Here it is again, a bit better photo, showing how the WSO/sculptural clay shows through between the black slip.

Then I threw a second one which was almost the same, just a bit larger.  I am absolutely loving this shape.  I guess that's why I keep throwing it.
Here are the two together, so you can see the relative sizes.

The third one was even larger, and I decided not to use the stars, just try for a lot of lumpy texture.  As I was pushing it out, I could see the pot slumping onto the bat, so I pulled it off, and suspended it upside down on this stool, to revive the shape.  It worked like a charm.

Here is the underside of that big pot.  Since I was trimming them pretty fresh (forcing them a bit with the heat gun), and because I like playing with interesting feet, I ended up trimming each one different, but a lot of multiple feet.  I really liked the way this one turned out.

My final (fourth) pot today was probably the lumpiest of all, and smallest.  I used up the remainder of my WSO clay bag.  Again, I forced it with the heat gun, so I ended up throwing and trimming all four new pots today.

Then I trimmed all 7 of the marbled pots which I threw on Sunday.  I was really busy right up to the end of day, finishing all those, so didn't take much in the way of photos.  But here are a couple of them :
Very nice marbling.  I look forward to seeing if I can preserve and enhance this pattern during glazing.

Again, playing with the multiple feet.  This one, that wonky bowl.

Oh, and I should add that one of my pieces was selected for a student display in the window again.  This little one.  It's not my favorite, but I'm proud to have him selected.

He will take the place of the triangle platter which has been on display since about December.  I got to bring that sweet little platter home finally.

I hope to have time this weekend to take some good photos of my new pieces. We'll see.

Monday, February 20, 2017

First Batch of Finished Items from Spring Ahead Course

I was expecting to pick up my first batch of finished pieces on Wednesday, when I go for my class, but tonight I passed by the studio to take my son to soccer practice, and realized that I could go in and pick up my pieces.  Sure enough, the kiln had been unloaded, so I hauled a number of them home tonight.

The lighting was not good to take photos, but I took a few anyhow.  When I get a chance (probably on the weekend), I'll need to take better photos, especially if I can find some natural light.

First of all, there is my old grizzled dragon mask :

Then there were a series of sodium silicate vessels, and pieces for my totem :

A closer look :

...and a different angle :
Overall, I'm pretty pleased with the results.  Some are quite good, others were not at all what I was trying for, with the glazes.  Especially the shinos.  They really misbehaved this time.  But it's all good, and I'm thankful for the opportunity to experiment and learn more each time.  That's really what it's all about.

Sunday, February 19, 2017

Marbled Vessels

Today was another "bonus" pottery day, as I went into the studio on a Sunday afternoon.  It was a rainy day, so I guess a lot of other people had the same idea.  All wheels were taken, and a couple of people were turned away, since there was no more room.

I had in mind to throw a few items from WSO / sculptural clay, for my raku one-day course in March, and then rework and revive some odd bags of clay which I had in the garage for too long.  But when I got there, I realized I should tackle the old clay first, since it may need some time to either soften or firm up.  So I started dumping bags of clay onto the table, and wedging.

I ended up mixing together P570 white clay, H550 grey clay, Willamette Yellow clay, and a little bit of brownish clay (I think it had some brown slip which I had trimmed or something like that).  The result was pretty pleasing.  I made these 6 vessels :
...and this bowl, which was a bit wonky, so I wonked it some more, to look intentional :
Here's a better look at those pieces :
...and a couple at a time :
(I made sure that wheel wasn't plugged in, before loading my pieces there.  And that was the "stand up" pottery wheel which I've never seen anyone attempt to use, even on a day like today when there were no other wheels available.)

I guess I'll be busy trimming these 7 pieces on Wednesday.

Thursday, February 9, 2017

Final Egg Hatching - Sort Of

I asked my 16 year old tonight what he thought I should do with that remaining egg.  I have created two dragons peeking out (see this dragon hatchling and this one), and two with just a claw poking through.  He suggested something like the little eggs at Easter with feet on them.  I replied that the clay was heavy, I didn't know how I would be able to make it stand.  So he suggested that they could be sitting down.

I don't think this is ANYTHING like he was imagining (based on the expression on his face when I showed him the work in progress), but here's my attempt at feet, and then a tail so it doesn't appear to be bird feet :
It's not quite done yet.  I will create some cracks around the feet and tail, and maybe even where the head would be, so it is more clear that this is an egg, rather than a sculpture which I abandoned part way through forming the body.

Here it is from another angle :
It's not my favourite at this point, but it's pretty fun, I think.


11:45PM update :  I guess I couldn't sleep without finishing this one, so here it is.  I think I'm done now :
 Yes, that's fun!

Wednesday, February 8, 2017

Short Pottery Day

As I was buying more clay at Shadbolt Center this morning, there was already talk about a snow storm, and afternoon and evening classes were being cancelled in anticipation.  I was glad our morning class was not affected, as it seems like a long week since I was last in the studio.


I decided that before starting new work, I would finish up some of my work in progress.  So I started with trimming this pot which I plan to use for the raku firing (and save the decorating for the glazing step) :

I then decided to continue with glazing my many pieces which have been bisque fired already.  With the sodium silicate pots, I tried to think of various ways to glaze them, and hopefully will end up with some nice results.


For the turquoise slip ones, I decided to add a black stain, to accentuate the cracks.  In one case, I applied wax to the surface first, and in the other, I was just careful not to apply too much stain to the slip-covered areas, since I had already learned from a classmate that when wiping off the stain, the slip was inclined to wipe off also.


So here are a few of the pots, in various states of being stained and glazed :


I was making good progress with the glazing when we heard that Shadbolt was getting closed down, due to the snow warnings, and snow already starting to fall.  So we only got about an hour into the drop-in workshop, and needed to pack it all up, and clean up.  Such a shame.  But I did manage to glaze enough pieces that hopefully they will be fired in the next couple of weeks, and I might be able learn from the results before needing to finish the remainder.  We'll see.

Tuesday, February 7, 2017

Funky Dragon Hatchling

I am pretty pleased with this little hatchling.


I have one more egg, which I hope will hatch soon.

Tomorrow I look forward to being back in the studio.  I had hoped to go in on the weekend, but it was closed due to snow.  So I can't wait.

Thursday, February 2, 2017

Claws and Eggs

I so enjoyed that egg with the claw poking through, that I made a sibling for it.
This time I left the claw only for a couple of hours to firm up, so I was able to maneuver it into position more easily.  I am pleased with the result.


The egg on the left is the fresh one.  The one on the right nearly dry (thus the change in colour).  I can't wait to finish these pieces.

Wednesday, February 1, 2017

Hand Building and Glazing

Before I talk about today, I had a second egg start to hatch :
Pretty fun.  I made the claw in the evening, and let it dry overnight, draped over a toilet roll, and added it to the egg in the morning, when it was firm enough to handle :

Today was a long but productive day again.  Our instructor, Jay, wanted to demonstrate assembly of clay lanterns / bird houses / whatever using clay slabs and wooden molds.  While I was waiting for the demo, I started the piercing of the candleholder which I will fire in the upcoming raku workshop :
It was really moist clay when I cut the little windows, so I let it firm up a bit while I made one of the lantern shapes, and then returned to clean up and finish it.  Here it is at the end of the day :
I think it will make a very nice candle holder.

I already made one of the big lanterns last year, with my elaborate clematis design.  Here it is, displayed in the garden (although it has come to live above the kitchen cabinets, indoors) :

So this year, I decided what I need more than another lantern, would be a large base for another ceramic totem, since I already have a number of totem pieces on the go and finished previously.  So I ended up making an obelisk shape :
It was pretty easy to assemble, using Jay's wooden molds :

When I decided on the obelisk shape, I looked up obelisk in Google Images, and found out that many of them featured hieroglyphics.  I had no such stamps, and didn't want to spend a lot of time hand carving hieroglyphics (even if I knew what I wanted to express), so I ended up borrowing my friend Roma's rollers, and then adding an Egyptian themed sprig (which I made in a previous course) :
I'm pretty pleased with the result.  It has a hole in the top and bottom, so will be a great totem base.

With 1.5 or 2 hours remaining after finishing these two pieces, I decided there was not enough time to make a wheel messy, and I was tired from the hand building on such a large scale (and pretty much already finished off my bag of clay), so I decided to get a head start on glazing.

It was quiet and peaceful in the kiln shed, but the glazes had not been used for a long time, so I ended up doing a lot of stirring, as I probably used 8 different glazes for the 6 pieces which I glazed.  But I was glad to make some progress, and know that some of my pieces will make it to the first gas firing.  Hopefully this weekend or next Wednesday I can do more building but also more staining and glazing, to keep pieces moving along.