Monday, July 31, 2017

Finished Leaf Plates and Decorative Plates from this Summer

The summer session at Shadbolt always seems so short, as the studio is closed from late July until mid September.  Which makes my season for leaf imprinting on clay short also.  So this session I decided to make some clay bowls from hosta and hydrangea leaves.

I ended up with 4 leaf plates, all built from a slab of B-Mix clay :
Beautiful leaf ceramic plates with frogs, snakes, and ladybugs, pottery by Lily L.

Here they are, starting from largest to smallest :
Beautiful hosta leaf ceramic plate with frog and snake, pottery by Lily L.
1) This hosta plate is adorned with a little frog.  It's funny that I didn't keep notes on the glazing, but I guess I was in a rush that day.  I seem to remember using Matt Green glaze on the frog, leaving his eyes unglazed, in Yellow and Black underglaze.  I then waxed him and dipped the leaf in Tam's Green.  I really like how the Tam's Green turned out.  It is a very natural color for a leaf.  The little snake underneath is unglazed, with Yellow and Black underglazes to accent the eyes and snout.  He's a sweet little snake, and works nicely as a foot for the plate.

Beautiful hosta leaf ceramic plate with ladybug, pottery by Lily L.
2) This hosta leaf plate features a single ladybug, which is finished in Red and Black underglazes.  He is very cute.  The foot is itself a little leaf.  The plate was hand brushed in a Green underglaze, and the bug waxed (he's not shiny), then then whole thing sprayed in Clear.  It turned out a cheery aqua colour.  Not too different than a blue hosta leaf, but I think I prefer the Tam's Green result better, myself.

Beautiful hydrangea leaf ceramic plate with ladybugs, pottery by Lily L.
3) This hydrangea leaf plate is adorned with two ladybugs.  It is the same aqua green color, which was created from the Green underglaze sprayed with Clear.  The bugs are also glossy, so I sprayed them clear.  Here are the little ladybug faces, just after applying the Red and Black underglazes :
Beautiful hosta leaf ceramic plate with ladybug, pottery in progress by Lily L.

Beautiful hosta leaf ceramic plate with ladybug, pottery by Lily L.
4) This little hydrangea leaf plate features a single ladybug, and a swirly foot (for someone who is scared of snakes).  When I waxed the little bug, I ended up dripping a bit of wax on the plate.  So instead of scraping it off, I dropped a few more spots, and I really like the effect, it looks like little spots where the leaf has been damaged by an insect or disease.  I will remember this for another time.  It is Tam's Green, and the ladybug was waxed before dipping, so it is a matte finish.  Very nice all around.

I also played with a few other slab built ceramic plates, decorated with stamps and snakes and such.

Beautiful handmade stamped snake plate, pottery by Lily L.
5) This little snake plate is wrapped in a snake on the top, as well as adorned with a tiny snake on the underside.  I love it so much, I could scream.  I really want to make more like this one.  It features some of my handmade stamps, in various patterns, enhanced by Deep Blue and Khaki glazes before being sprayed Clear.  And the snake as well as underside, I brushed in Green underglaze before spraying with Clear.  I really like the color combinations.  Both snakes' eyes are Yellow and Black underglaze, although the Yellow has pretty much faded out, even though it is a high fire underglaze.

Beautiful floral stoneware plate with a snake surprise, pottery by Lily L.
6) This tiny bowl is adorned in red roses, but bears a little surprise underneath.  I love it too.  The little snake is so unexpected on this one.  It is Red underglaze, Deep Blue glaze, and sprayed Clear all over.  Beautiful vivid colors.

Beautiful stamped stoneware plate, pottery by Lily L.
7) This little plate is decorated with my handmade stamps, the colors highlighted with Deep Blue and Khaki glazes (the Khaki was also brushed on the back and rim), and then the whole plate is sprayed Clear.  I have a feeling my sister Rose would like such a plate, so I'll check with her first before giving up this little beauty.

I still have more photos to post, but I'm running out of steam tonight, so I'll stop at the plates for now, and post the remaining photos another night.

Sunday, July 30, 2017

Finished Pieces from Tony Clennell Workshop

I picked up a lot of finished pieces today, including those from the Tony Clennell weekend workshop, and I was VERY pleased with the results.  I think the glazes are finally working for me instead of against me.  Here are the beauties from the Tony Clennell workshop, and I will post the other pieces another time.


During the workshop (which was 3 days, but we took a 4th day to finish up), I created 4 large pieces, and 4 mugs.  All turned out well beyond my expectations.


Let's start with this covered casserole dish...
Tony Clennell inspired large covered casserole pottery dish by Lily L.


Tony Clennell inspired large covered casserole stoneware dish by Lily L.
1) This casserole dish was thrown from B-Mix white clay.  It was very stiff (and the P570 white clay which I love because it is buttery smooth and soft was sold out), but I managed to throw it.  The base was thrown as a shallow dish from approx. 2300g of clay.  The top part was thrown as a bottomless bowl, from 2200 g of clay, and attached.  Then the pedestal and the lid (approx. 2000 g) were thrown from the same clay.  The handles on the side were thrown as a ring, and then cut in half and attached.


It is decorated on the sides with thick slip. The glaze is Ash Yellow, which gives the look of a soda fired vessel, and has some beautiful visual texture.  I sprayed it lightly in spots with Khaki, which gives it a slight blush.  But even under the lid, which I don't remember spraying with Khaki, I have some beautiful blush of a rusty color.  It couldn't have turned out more beautiful, in my opinion.  When it was bisque fired, the handle on the top of the lid had popped off, but very cleanly.  So I took a chance and attached it with glaze, and that did the trick.  I'm very happy about that, as I had already accepted that I may end up with a lidless casserole, which would have been a shame, since it is such a beautiful lid.  The little dimple on top is something I learned from Tony, it makes it easier to grasp the lid.


I made another one which is very similar, except it features a large thrown handle :
Tony Clennell inspired large bowl with thrown handle by Lily L.


Tony Clennell inspired large bowl with thrown handle by Lily L.
2) This big fella was thrown from similar amounts of B-Mix clay.  My notes say it was 2300g for the base, 1400g for the top, 1400g for the thrown handle, and 600g for the pedestal.  The big handle was thrown as a ring, cut in half, attached together, and pinched to give the join more compression, as well as to create a beautiful spine on the handle.  (It reminds me of my big dragons.)  I really like the beautiful swirl on the inside, and also the line which I added on the pedestal.  I had also added some dramatic Tony Clennell style loop handles on either side of the big handle, but they had cracked off during the drying process.  We all seemed to suffer some losses, probably since we were rushing so much to finish everything, and it was a very hot and dry day when we were working on the pieces, so they were quite dry already when we combined and added attachments.  I'm glad they popped off cleanly, leaving no trace, so it looks great without them.


The glaze is again the Ash Yellow, which performed beautifully.  My notes say I sprayed a bit of Khaki as well, but I see that it was just on the underside, which has a slight blush.  Beautiful.  And I used Deep Blue to accent the fine line on the pedestal.


And the final one thrown and assembled in a similar manner :
Tony Clennell inspired large pedestal bowl by Lily L.


Tony Clennell inspired large pedestal bowl by Lily L.
3) This big fella was thrown from Columbia Buff w/ Grog clay, 2300g on bottom, 1800g on top and pedestal of approx. 700g (which I later cut down since it was too tall).  It is glazed in Tenmoku, and then Copper Red added inside.  It is a bit dark for my liking, but I knew this Tenmoku + Copper combination would produce an interesting result, and it didn't disappoint.  It is quite swirly, which is what I was hoping.


This is my final large piece, which Tony demo'd as a pitcher, with a spout and handle.  But I couldn't get myself to create a pitcher.  I had decided I would like to add two handles, but in the rush to finish, I decided I liked it without any handles, just as a simple vase.  It is more versatile that way, right?


Tony Clennell inspired large pottery vase by Lily L.
4) This big boy is a full 14" tall.  It was thrown from B-Mix clay in 3 pieces :belly (2600g), top (probably 2/3 of that), and closed pedestal.  It looked a bit too weird (the proportions looked wrong to me) when finished, so I added a very gritty slip to it as decoration.  The glaze is Ash Yellow, then sprayed in the middle with Khaki.  I really like the resulting rusty color, I think it matches the rough texture very well.


Then my 4 mugs, which I experimented with applying very different glazes :
Tony Clennell inspired stoneware mugs by Lily L.


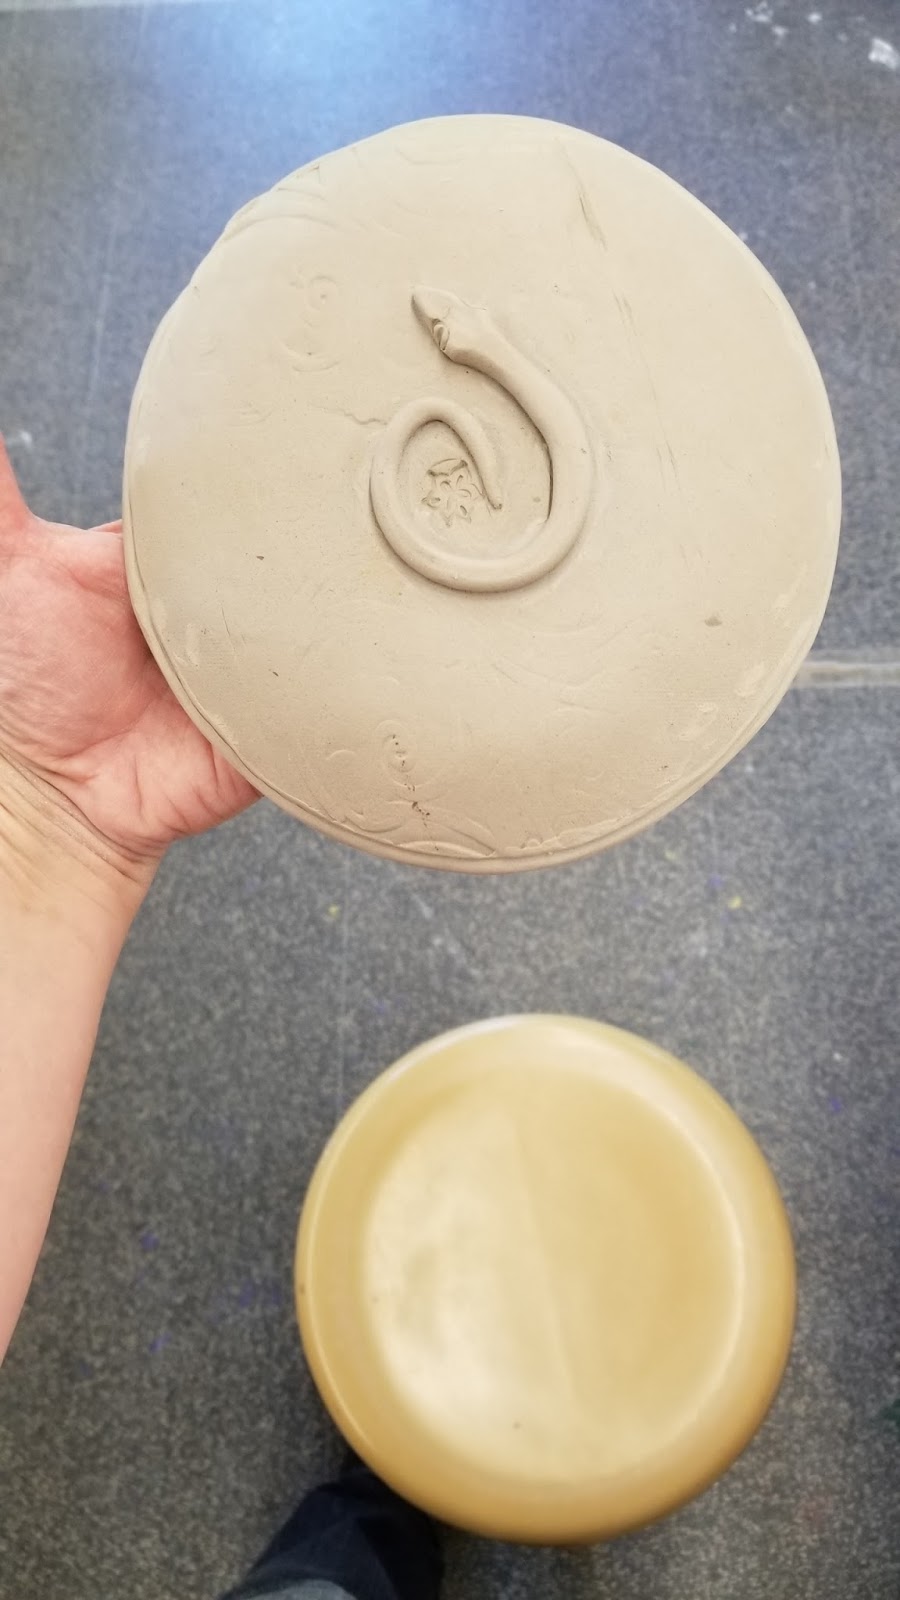
This first one is very rustic, suitable for a cabin :
Tony Clennell inspired stoneware mug by Lily L.
 5) This rustic mug was thrown from 700g of the Columbia Buff w/ Grog clay.  The handle is pulled to one side, suggesting a snake, or perhaps a horse tail.  It is surprisingly comfortable.  And the little decorative button on the top of the handle (with seashell pattern) begs to be a thumb hold.  It is finished in Ash Yellow glaze, with Deep Blue accents on the handle and seashell.  I love the variation in colors and the heavy freckling.  It really looks like something which would come out of a wood firing.


Tony Clennell inspired stoneware mug by Lily L.
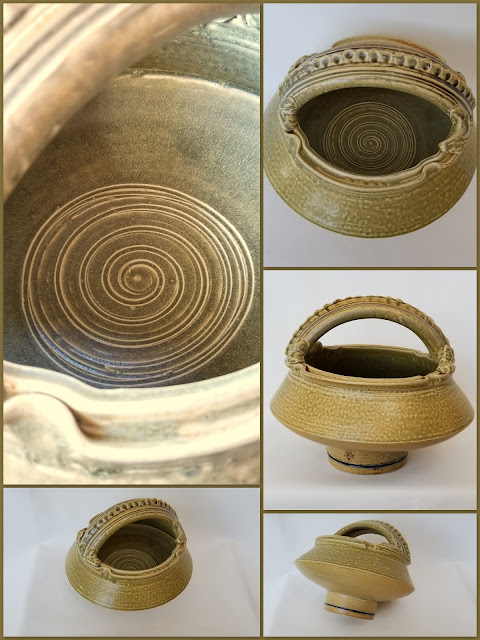
 6) This mug is also 700g of the Columbia Buff w/ Grog clay.  It has a simple rustic bottom, but appears sleeker and more refined than the previous mug.  It is glazed in Copper Red, which I dipped, and then double-dipped the top half.  I haven't had good success from Copper Red in the past, usually ending up with white, but this is a beautiful Copper Red result.  Very rich and even hinting at being drippy.  I really love it, and  again it is surprisingly comfortable, and I really like the spiral embellishment on the handle.


Tony Clennell inspired stoneware mug by Lily L.
7) This was also thrown from 700g of Columbia Buff w/Grog.  It features a trimmed bottom, which I prefer.  The glaze is Carbon Trip Shino, which is so unpredictable, but usually beautiful.  Surprisingly it came out mostly the same color, except the rim is shinier than the rest of the mug.  The color is really rich, I think because of the high iron content in the clay.  It is a bit funky to drink from, with those pulled up sides, but I think it could become a good friend to someone.


Tony Clennell inspired stoneware mug by Lily L.
8) This is probably my favourite of the 4 mugs.  In fact, it may become my mug at work, as the (commercial, mass-produced) one I have now is a bit chipped.  It is a bit smaller than I'm used to (the other easily fits 14 oz), but it has a really beautiful feel, is artistic, but refined.  It has a trimmed foot which is pushed in in 4 spots, to mirror the rim which is also pushed in, to form a sort of floral shape.  Thus the embellishment on the handle is floral also.  There is a nice swirl inside at the bottom, and the Tam's green glaze is rich but elegant.  Yes, I think this one will need to come to work with me.


Speaking of mugs and pottery, I am ECSTATIC to announce that Hemlock Mountain Coffee Co. in Agassiz is now carrying my pottery.  If you are ever passing by that way, make sure you stop in for a coffee and browse their giftware.  They have excellent online reviews for both their coffee and their service.


I just stopped by their Facebook page, and was excited to see my pottery in a couple of their photos :
Pottery by Lily L, featured at Hemlock Mountain Coffee Co in Agassiz BC


Pottery by Lily L, featured at Hemlock Mountain Coffee Co in Agassiz BC


I brought home a lot of other exciting pieces (many of which will end up at Hemlock Mountain Coffee Co., I'm sure).  One piece which will NOT be for sale, at least for the foreseeable future, is my beautiful beast of a vase featuring three winged dragons.  I will post more photos next time I have a chance, but here is me after just arriving home, beaming with joy that it survived both firings, and the glazes look amazing :
Amazing dragon pottery by Lily L, featuring winged dragons.
Stay tuned.

Wednesday, July 19, 2017

Half Glazed

That's what I felt like today.  It was a very busy day.  My friends commented that I was unusually non-talkative.  In fact, I was quite focused, working through my pieces and glazes one by one, checking them off in my notebook.

I got some of the major pieces glazed today, including my 4 mugs and 4 large items from the Tony Clennell workshop.  I also glazed my monster pot adorned with three winged dragons.  I didn't take many photos today, but I managed to get a few of my dragon pot.
Big ceramic dragon pot in progress, pottery by Lily L.
I'm going to leave the glaze as a surprise, but I wiped the glaze off the eyes, and dabbed them with a red underglaze from my friend Cindy, since I managed to pull my high fire underglazes out of my bag last time I went to the studio, and forgot to put them back in.  I hope it will work out, since it was marked as Cone 06 - 6.  Oh well, it will be a different color than the rest of the pot, which is the most important.  Fingers and toes crossed on this one, after so much work and anticipation.

I realized very quickly that I would not finish all my glazing in the 4 hour workshop.  I ended up with quite a number of smaller pieces which I will need to glaze (and stain many of them!) Sunday :
Ceramics in progress, pottery by Lily L.

In fact, even if I had finished my glazing, I still have those 7 mugs I finished last Sunday, which I moved to the kiln shed today, and hopefully they are ready to glaze Sunday also.  So Sunday will be a very busy day, as it is also the glaze deadline for getting the pieces finished this term.  Otherwise they would need to wait until September when the studio re-opens.  Not so desirable.

Sunday, July 16, 2017

Getting a Handle on it

I spent the day today making handles for my 7 mugs.  Actually, only 6, since I decided not to add a handle to one of them.  Normally I would find that frustrating, to spend so much time on such an activity, but I found it rather therapeutic.  I think I see more mugs in my future.

My friend Mariana was going to extrude handles, so I ended up doing that (while she changed her mind and made hers from coils), and then altering them before attaching them to the mugs.  Here are my finished mugs, ready for the bisque firing :

Textured stoneware pottery mug by Lily L, in progress.
This one features the stamping, but also 3 grape leaves (so they can be seen from all sides).  I will need to stain the leaves so they are visible, otherwise they are quite subtle.

Textured stoneware pottery mug (or stein) by Lily L, in progress.
This one is my overly-poked mug, but I am still very pleased with the effect.  I may have gone a bit big on the handle, but I think it is fairly proportioned to the height of this one.  Looking at it now, I may have squared off the handle a bit more, rather than the round shape.  And this one looks a bit more like a beer stein than a coffee mug, for sure.

Textured stoneware pottery mug by Lily L, in progress.
More of a traditional shaped coffee mug, with a few types of poking.

Textured stoneware pottery mug by Lily L, in progress.
I'm quite liking this one.

Textured stoneware pottery mug by Lily L, in progress.
It doesn't show in the photo, but the two lines in the profile on the bottom edge is mirrored by two lines on the length of the handle, which looks rather smart to me.

Textured stoneware pottery mug by Lily L, in progress.
Again, a fairly traditional mug shape.  With some funky button embellisments on the top of the handle, which mirror the design :
Textured stoneware pottery mug by Lily L, in progress.
Hmmm, come to think of it, I also stamped one of the handles, where it attaches at the base, but I forgot to take a photo of that.

Textured stoneware pottery mug by Lily L, in progress.
This one seemed a bit large for a mug, even for me, so I decided to leave it as a small bowl.

I'm excited to play with a few glazes and glaze combos, and see if I can get some to play with my textures.  Stay tuned.

Wednesday, July 12, 2017

Mugs and Poking

Today I was inspired to start 7 large mugs.  On the weekend I hope to clean up the bottoms (I threw them such that I don't expect to need to trim them for thickness/weight), stamp them, and add handles.

I was trying to throw them and introduce an intentional wonkiness to them.  With some success, but I wasn't completely satisfied with the result, as they were not as wonky and I had hoped.

Then a classmate borrowed some of my handmade stamps, and was raving about how much she liked them, which reminded me that my new stamps would be out of the bisque firing now, so I fetched them and tried them out.

Some of my latest stamps were inspired by the poking / stamping of Paul Lyon (see his Instagram account lyonclay).  He is the master of stamping and then using a gorgeous fluid glaze which ranges from golds and browns to a beautiful blue.  I'm always in awe of his results, and how many beautiful combinations he can generate with his stamping and poking tools.

Anyhow, I kind of went crazy with the stamping, but I loved the effect.  I hope I can find glaze combinations which will embrace and enhance the texture :
Handmade pottery by Lily L, in progress.

So here they are, the first and second :
Handmade pottery by Lily L, in progress.

...and third :
Handmade pottery by Lily L, in progress.

..fourth and fifth :
Handmade pottery by Lily L, in progress.

...sixth :
Handmade pottery by Lily L, in progress.

...and seventh :
Handmade pottery by Lily L, in progress.

I'm pretty excited to see these finished.

Oh, I should add that I got a nasty sting from a wasp this morning.  I inadvertently came too near their nest in the ground while weeding, and next thing I had a very sharp pain in the back of my right hand, and several wasps circling me madly.  It was very painful, but I didn't think much of it, since I don't really react much to insect bites.  Except this one.

As the afternoon went on, I first found it painful and difficult to make a fist or pick up anything.  Then it progressed to not being able to clench my fist or straighten out my fingers.  My hand swelled up quite a bit.  It is late at night, and my hand still seems to be about twice the usual thickness, and very painful when I move it.  I have purchased and taken some store-brand Benadryl, and hope that will reduce the swelling a bit tonight, so I can behave relatively normally tomorrow.

So I discovered that I needed to improvise quite a bit with the throwing, using my left hand a lot more than usual, and using different parts of the hand for throwing.  It was a sort of fun challenge, for one day.  But now I think I've had enough challenge, and will be glad when it is back to normal again.

Sunday, July 9, 2017

More Fun Plates... Leaf Plates

I had so much fun Wednesday making fun little plates with snakes on the bottom, that I decided to continue with more plates today.  This time, from leaf imprints.  I ended up making 4 plates today.

Ceramic plates from hosta leaf, nature-inspired pottery by Lily L.
This first one was created from a pretty good-sized hosta leaf.  I added a frog to it, and a snake as a foot.  Fun.

Ceramic plates from hydrangea leaf, nature-inspired pottery by Lily L.
These next two were made from hydrangea leaves.  They feature ladybugs on top.

Ceramic plates from hosta leaf, nature-inspired pottery by Lily L.
The final one is made from a hosta leaf, but also features a ladybug on top.

Here is a closer look at one of the ladybugs :
Closeup of hosta leaf plate featuring ladybug, pottery by Lily L.
Pretty cute, I think.

Wednesday, July 5, 2017

Fun Plates and Handmade Stamps

I was awake early this morning, on my day off work, but managed to stay out of the garden, so that my stonemason could repair our concrete/stone steps in peace.  Instead I did some baking, and played with some clay, making some stamps, and clay marbles which will be eyes for my garden frogs.

Nature inspired pottery by Lily L, in progress.
I'll post better photos of the stamps once they're bisque fired, and I can try them out.  But they should be quite useful.  Same with the frog eyes.

I thought I would be able to load the stamps and marbles inside the big dove tree platter I made last week, but I had covered it too well, so it was not dry.  If I had thought about it, I may have forced it to dry in the beautiful sunshine today.  But instead I have allowed it to dry slowly in the cellar, and I'll transfer it to the kiln shed on Sunday.

So I decided I would do a bit more slab work, and make some smaller plates, and they could also carry my stamps safely through the bisque firing.

Nature inspired pottery by Lily L, in progress.
The first plate I made was this little one.  I tried out this silicone mold (designed for fondant, I believe), and lined the rim with little roses.  I think if they don't break off, this will look really good.  I made a little surprise underneath :
Surprise underneath - nature inspired pottery by Lily L, in progress.
Instead of a regular coil for a foot, it is a little coiled snake.  I am pretty happy with the result.  My pottery friends encouraged me to make more.  So the next plate also had a snake underneath:
Nature inspired pottery by Lily L, in progress.
...and a snake on the rim, encircling a design made from my handmade stamps :
Nature inspired pottery by Lily L, in progress.

My third plate was decorated with my handmade stamps :
Hand stamped pottery by Lily L, in progress.
...but no snake underneath, just a ring-shaped foot cut from a slab :
Pottery by Lily L, in progress.
For the fourth piece, I used the circle from the center of the foot in the previous piece, and added to it stamped pieces :
Pottery by Lily L, in progress.
The beauty of the little bowl is from the underside :
Hand stamped pottery by Lily L, in progress.
Not bad for a 4 hour drop-in workshop :
Nature inspired pottery by Lily L, in progress.
...and then I had a way to transfer my new stamps and marbles to the bisque firing :
I can't wait to get back on Sunday, and see what inspires me next.