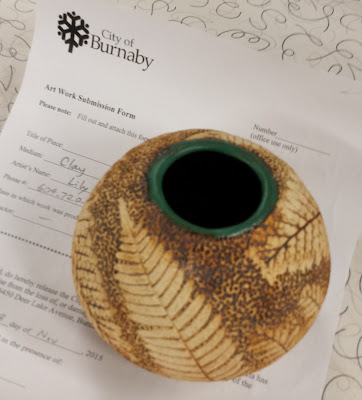
I have glazed all the items from my course (and drop in workshop) except a few which I thought wouldn't be bisqued in time, which I brought home, and will take in during the Spring session. So soon I will have all the remaining pieces - there are a LOT of them. But in the meantime, here are a few more which I brought home last class :
9) First, this little beauty, which I didn't bring home. I didn't even get a good photo of, since it was selected for a student exhibit at Shadbolt, so I left it with them. It will be in a display case on the outside of the ceramics building for the winter. I'm pretty excited, both at being selected for another exhibit (it is my 4th time now), as well as how well this little piece turned out. I am really loving this technique, and hope to make many more in the Spring once pottery starts up again, and there is a good supply of fresh leaves.
My notes say I started with 1500 g of sculptural clay, but lost a lot while centering. Anyhow, it is a spherical vase, with a trimmed foot, and finished with an oxide-based stain formulated by Bob Kingsmill, and glazed Matt Green inside and on the rim. It is decorated by the imprint of four different types of ferns from my garden.
10) I was glad to bring this little beauty home. It was created from 1100 g of sculptural clay, and also imprinted with leaves, this time from my viburnum bush. It was then stained with Red Iron Oxide. I left the opening at the bottom, so I could use it as a garden totem topper. We'll see. It also looks great on display inside the house. The photos turned out a bit dark; it is really more beautiful in person.
11) I missed this weisen mug when I picked up my items which made it to the first glaze firing. It was thrown from approx 600 g of Plainsman 570 white clay, and then a piece of black glaze pushed into front and back. The glass melts during firing, resulting in the big drip down the side. I'm not sure I'm crazy about the effect, but wanted to try it out.
It is glazed Deep Blue inside and on top. Celadon on bottom. It is stamped on the bottom, and also ended up with a crack during firing, although once glazed, it is still water tight, so can function as a beer glass, although a bit small for that use.
I had 4 or 5 of the bottoms of my mugs and jugs develop a crack, which is unusual for me. Maybe because I was trying a new method of finishing the pottery without trimming, and it may be a combination of bottom too thin, edges too thick, or when I tapped the bottoms so they were not flat (to prevent cracking), I may have weakened them. But funny enough, I spoke with two other students who also had unexpected cracking on their pieces. So we surmised that there was a crack fairy who was active in the kiln shed this session. I hope she's gone by January.
12) This is my first goblet. I'm really pleased by how it turned out. It was created in 3 sections, then combined together and decorated by slip trailing and adding the leaves from a sprig mold. I learned something, though. Some of the slip trailed sections were a bit rough, and the Amber Celadon glaze is almost sharp in a few areas as a result. Next time I will sand down those spiky or rough areas before glazing. But it still has a pretty nice feel in the hand. It feels like a goblet.


No comments:
Post a Comment